Image SEO for blogs can feel like a small job, but one bad image can slow your page, confuse Google, and block people who use screen readers. You may upload a great photo, yet lose value because the file is too large, the name is vague, or the alt text says nothing useful.
The good news is simple: blog image optimization does not need complex tools or coding skills. You only need a clear flow for image choice, size, format, file name, alt text, loading, and tracking.
Your goal is to help people and search engines understand each image, while also making it load fast. This image SEO checklist can support better blog rankings, but it cannot fix weak, thin, or unrelated content.
What Is Image SEO?
Image SEO for blogs means making each image useful, clear, fast, and easy for Google to find. It also helps people understand your image when it does not load or when they use a screen reader.
How Does Image SEO Work?
Google reads the file name, alt text, caption, nearby words, and page topic to learn what an image shows. So, place each image near matching text, use a clear name, and keep the file small enough to load fast.
Good image SEO gives you two chances to rank: your blog page may rank better, and the image may appear in Google Images or visual search. Images can rank on their own, but they still need strong page context, image relevance, and crawlability.
The Four Parts of Image SEO
Alt text is only one small part of image SEO. Focus on four parts:
- Relevance: Use an image that helps the reader.
- Semantics: Add a clear file name and alt text.
- Performance: Resize and compress the image.
- Discoverability: Let Google crawl and index it.
In simple terms, image SEO for blogs helps your images serve readers first and search engines second.
Does Image SEO Matter for Every Blog?
Image SEO for blogs matters most when pictures help you teach, prove, compare, or inspire. Food, travel, craft, fashion, product, tutorial, and data blogs gain the most because readers need to see the result.
Useful images can explain a hard step, improve access, and help Google understand the page. They may also bring visits from Google Images and give you assets for social posts.
| Blog type | Best image |
|---|---|
| Tutorial | Marked screenshot |
| Food | Process photo |
| Data article | Original chart |
| Product review | Comparison photo |
| Opinion post | One editorial image |
| Checklist | Simple flow chart |
Still, every post does not need images. A text-led opinion may need one cover image, while a short update may need none.
Too many files can slow the page and raise design, licence, storage, CDN, and update costs. Decorative images add no useful meaning, so do not add them just to fill space.
Use one rule: add an image only when it explains, shows, proves, compares, or adds real feeling. This keeps image SEO for blogs useful, fast, and worth your time.
The 10-Minute Blog Image SEO Workflow
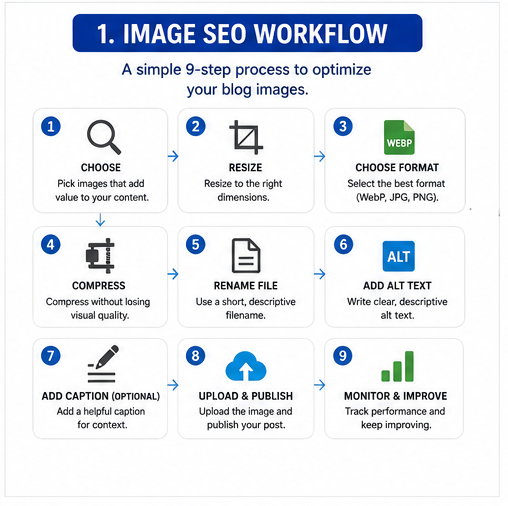
Use this blog image SEO workflow before you upload each image. It keeps your page fast, clear, and easy for Google and readers to understand.
Quick Image SEO Checklist
- Choose a useful image: Add a photo, chart, or screenshot that helps your reader.
- Check usage rights: Use your own image or confirm its licence.
- Crop the image: Match your blog’s planned shape and ratio.
- Resize it: Use the largest width your page will display.
- Choose a format: Use WebP for most blog images.
- Compress it: Cut file size without making the image blurry.
- Rename it: Use short, clear words with hyphens.
- Write alt text: Describe the image in its page context.
- Set image loading: Add width and height; lazy-load only images below the fold.
- Publish and test: Check the page on mobile, then track speed and search results.
Google uses alt text and nearby page content to understand images. Also, never lazy-load your main above-the-fold image because this can delay page loading.
Step 1: Choose Images That Add Information
Good image SEO for a blog starts with one simple rule: each image must help your reader. Use an image to show a step, prove a claim, explain data, or make a hard idea simple.
Choose Useful Images First
Use this order when you select an image:
- Original data chart
- Original photo
- Annotated screenshot
- Custom diagram
- Licensed stock photo
- Generic stock photo
An original chart, photo, or screenshot shows work that only you can offer. A common stock photo may look nice, but readers have often seen the same image on many sites.
Match the Image to Its Job
An informative image teaches something, such as a chart or process photo. A functional image starts an action, while a decorative image only improves the page design.
Place each image close to the text it explains. Google uses nearby text and captions to understand an image and its place on the page.
Do not hide key facts inside a chart or graphic. Add a short text summary below every complex graph so all readers can understand its main point.
Before using stock or AI-made art, check its source, licence, editing rules, and credit terms. You cannot use an image just because you found it on Google; many Creative Commons licences also require clear credit.
For example, replace a laptop stock photo in a tutorial with numbered screenshots that show each click. This small change improves image SEO for your blog and helps readers finish the task without guessing.
Step 2: Choose the Best Image Format
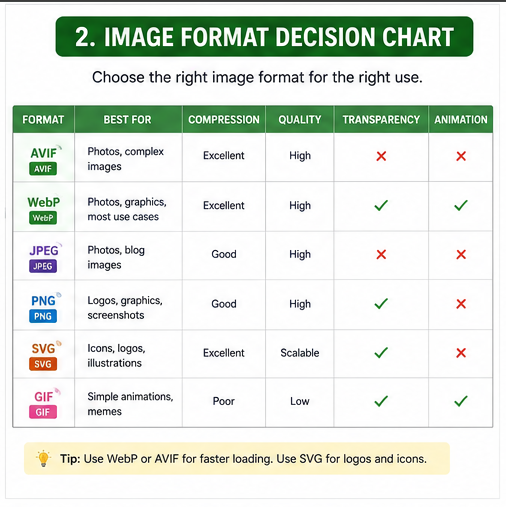
The best image format for SEO keeps your picture clear and your file small. For most blog posts, start with WebP because it offers good quality with less file weight.
Quick Image Format Guide
| Format | Best use | Main benefit | Main limit |
|---|---|---|---|
| AVIF | Photos and rich visuals | Very small files | Export may take longer |
| WebP | Most blog images | Great quality-to-size balance | Some old tools handle it poorly |
| JPEG | Standard photos | Works almost everywhere | Often larger than modern formats |
| PNG | Screenshots and transparency | Keeps text and edges sharp | Can create large files |
| SVG | Logos, icons and diagrams | Stays sharp at any size | Not suitable for photos |
| GIF | Short, simple motion | Easy to share | Heavy for long animation |
Google can index BMP, GIF, JPEG, PNG, WebP, SVG and AVIF images. Your file extension must match the real format: changing photo.png to photo.webp does not convert the image.
Which Format Should You Use?
Choose WebP for featured images, food photos, travel pictures and normal blog graphics. Choose AVIF when you need a smaller file, but check faces, shadows, colours and text after export.
Use JPEG when an old website or editing tool needs wide support. Use PNG for screenshots when WebP makes small text look soft or removes needed transparency.
Use SVG for logos, icons and simple charts because it stays sharp on phones and large screens. Clean each SVG before uploading it because the file can contain unsafe code.
Avoid GIF for long tutorials or screen recordings. A short MP4 or WebM video often looks clearer and loads faster.
Always check the final image on mobile and desktop before publishing. The best image format for SEO saves data without making the image blurry, broken or hard to understand.
Step 3: Resize and Compress Images Correctly
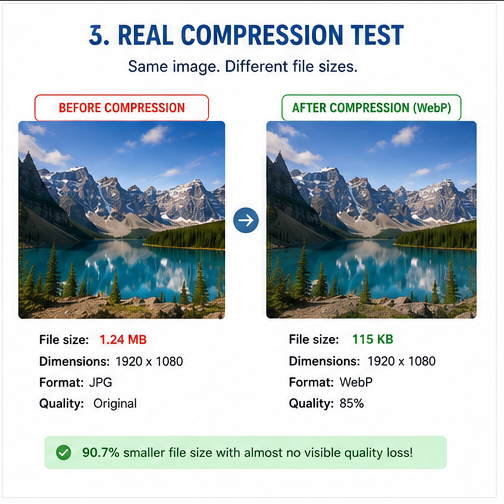
To resize and compress blog images, start with their pixel size. Then reduce the file weight after you set the right width.
Resize Before You Compress
Do not upload a 5,000-pixel camera photo when your blog column shows only 800 to 1,200 pixels. The browser still downloads the large file, even when the page displays a smaller image.
For most blogs, set a full-width image near the widest size your theme can show. You can keep a larger copy for sharp screens, but use srcset so the browser can choose a smaller file for phones.
Use a Flexible File-Size Goal
There is no fixed rule that says every blog image must stay below 100 KB. The right file size depends on the image type, detail, width, and purpose.
Use these ranges as practical goals:
- Small inline image: aim for 50–150 KB when possible.
- Large article image: aim for 100–250 KB when quality stays clear.
- Chart or screenshot: allow more space when small text must stay easy to read.
Choose the Right Compression
Lossy compression removes some image data and creates a much smaller file. It works well for photos, but strong compression can blur faces, text, and product details.
Lossless compression keeps all visible detail, but the file often stays larger. It suits logos, diagrams, charts, and screenshots with sharp text.
Always compare the old and new image at its normal page size. Never ruin chart labels or screen text just to meet a random file-size target.
For a large WordPress team, use one tested plugin or image CDN to resize, compress, and create responsive versions at upload time. WordPress has added srcset and sizes to generated image markup since version 4.4.
The best way to resize and compress blog images is simple: match the display width, keep the details clear, and serve only the file each screen needs.
Step 4: Write Descriptive Image Filenames
Your image filename for SEO should tell Google and your reader what the image shows. Rename each file before you upload it, because names like IMG_9384.jpg give no useful clue.
Keep the name short, clear, and tied to the real subject. Use lowercase words with hyphens, such as wordpress-image-alt-text-field.webp, because Google recommends clear, descriptive image filenames.
Use a keyphrase only when it fits the image. Never write a stuffed name such as image-seo-image-seo-best-image-seo-tips.jpg, because it looks forced and adds no value.
For screenshots, name the exact screen, button, menu, or task shown. This solves a common problem raised by tutorial writers, who often struggle to name interface images clearly.
Follow these simple rules:
- Give every image a different filename.
- Avoid dates that may soon look old.
- Keep the correct file extension.
- Do not copy the filename as alt text.
Finally, do not rename old image URLs only for SEO. Change them only when you can update links and add redirects, since stable image URLs help Google process your files.
Step 5: Write Useful Alt Text Without Keyword Stuffing
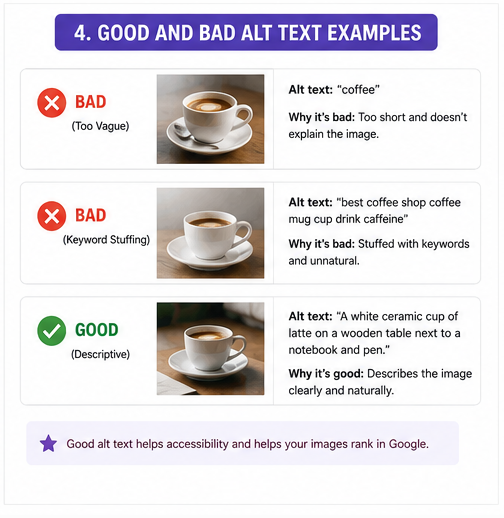
Good alt text for blog images tells the reader why an image matters on that page. Before you write it, ask: “What useful fact would be lost if this image did not load?”
Describe that missing fact in plain words. Do not list every colour, shape, object, or small detail unless it helps the reader understand the content.
Google says alt text should be useful, clear, and linked to the page topic. It also warns that filling alt text with keywords can harm the user experience and may look like spam.
Add Keywords Only When They Fit
You can use a keyword when it truly describes the image. Never force phrases such as “best image SEO tips” into a photo that does not show those tips.
Do not start with “image of” or “picture of” in most cases. Screen readers already tell users that the item is an image, so those words often add no value.
Match the Alt Text to the Image’s Job
Use an empty alt attribute for a design item that adds no useful meaning: alt="". This tells screen readers to skip dividers, borders, shapes, and other decorative images.
For a button or linked image, describe the action instead of its look. For example, write Download the image SEO checklist, not red PDF icon; functional alt text should explain what happens after the click.
Google may also treat the alt text of a linked image like link text. So, make the wording clear enough to explain the page or file that the link opens.
Use These Practical Examples
| Image type | Weak alt text | Better alt text |
|---|---|---|
| Tutorial screenshot | SEO settings | WordPress media panel showing the alt text field |
| Chart | Traffic chart | Organic traffic rose from 12,000 to 19,000 monthly visits after image compression |
| Food image | Best pasta recipe Italian pasta | Creamy mushroom pasta with parsley and parmesan |
| Decorative divider | Blue line | alt="" |
| Linked download icon | PDF icon | Download the image SEO checklist |
Do not copy the nearby caption word for word. Let the alt text replace the image, while the caption adds a source, result, note, or extra detail.
There is no useful fixed character limit for every image. Write only enough words to share the image’s purpose, and keep the same meaningful alt text on both mobile and desktop pages.
The best alt text for blog images sounds natural, explains the key point, and helps a person who cannot see the visual. Write for that person first; search engines will get a clearer signal too.
Step 6: Understand Alt Text, Captions, Titles, and Nearby Text
Alt text, captions, filenames, and nearby text do different jobs. When you use each one well, alt text vs caption for SEO becomes easy to understand.
| Element | Main purpose | SEO value |
|---|---|---|
| Alt text | Explains an image when it cannot be seen | High for useful images |
| Filename | Gives the image file a clear name | Helpful signal |
| Caption | Adds a visible fact, source, or takeaway | Helpful when needed |
| Image title | May show a small hover note | Low |
| Nearby text | Explains why the image matters | High |
| Page title and heading | Set the main page topic | High |
Use alt text to share the image’s key meaning. Google advises you to write useful descriptions that fit the page and avoid keyword stuffing.
Use a caption only when it adds a new fact: a date, source, result, or lesson. Do not copy your alt text into the caption.
Your nearby paragraph should tell the reader why the image matters. Google also studies captions, filenames, headings, and surrounding text to understand an image.
Treat the image title as optional. Touch users, keyboard users, and some screen-reader users may never see its hover note.
Keep the heading, paragraph, image, and alt text focused on one clear idea. This natural match helps both readers and search engines understand your content.
Step 7: Prevent Images from Damaging Core Web Vitals
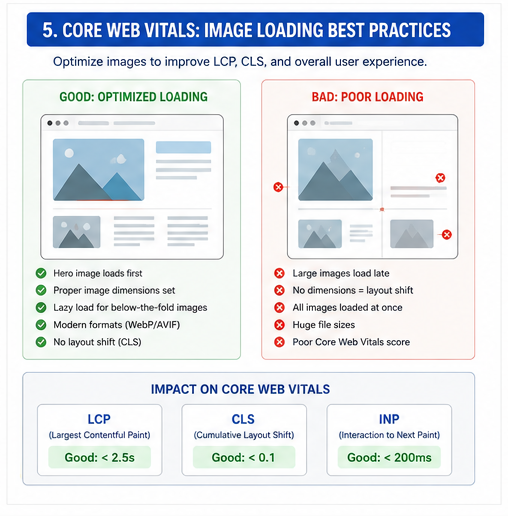
To prevent images from damaging Core Web Vitals, control their size, space, and load order. Large or poorly set images often slow the page, move the layout, and waste mobile data.
Images mainly affect three areas:
- Largest Contentful Paint: The main image may take too long to appear.
- Cumulative Layout Shift: The page may jump when an image loads.
- Transferred bytes: Large files use more data and increase load time.
Reserve Space for Every Image
Add width and height to each image, so the browser saves its space before loading it. You can also use CSS aspect-ratio, but the image must keep the same shape.
This simple step helps prevent layout shift. Google’s web performance guide says width and height values let browsers reserve the needed space.
Send the Right Image to Each Screen
Use srcset and sizes to offer several image widths. The browser can then send a small file to a phone and a larger file to a laptop.
<img
  src="image-seo-checklist-800.webp"
  srcset="
    image-seo-checklist-480.webp 480w,
    image-seo-checklist-800.webp 800w,
    image-seo-checklist-1200.webp 1200w"
  sizes="(max-width: 800px) 100vw, 800px"
  width="800"
  height="450"
  alt="Ten-step image SEO checklist for blog publishers">
This responsive image setup cuts waste without lowering image quality. Google also recommends srcset for different screen sizes and image versions.
Lazy-Load Only the Right Images
Lazy-load images that sit below the first screen. This delays files that readers cannot yet see and leaves more speed for key page content.
Do not lazy-load your main hero or featured image when it is likely to be the LCP image. Instead, load it early and use fetchpriority="high" when testing shows a clear gain.
Keep the real image URL inside normal HTML markup. Google warns that poor JavaScript lazy loading can hide content from its crawlers.
Use an image CDN when you serve many images, support global readers, or need automatic resizing. Finally, test the real blog post template on mobile because homepage scores may hide image problems.
To prevent images from damaging Core Web Vitals, reserve their space, serve the right size, and load the main image first. These steps improve LCP, reduce layout shift, and lower total page weight.
Step 8: Make Blog Images Crawlable and Indexable
To make blog images crawlable and indexable, place each key image in a normal <img src=""> tag. Do not show a useful photo, chart, or guide only as a CSS background.
Open each image URL in a private browser tab. It should load without a login, cookie, location block, or access error.
Keep the image URL stable after publishing the post. It should also return a 200 response, not a 403, 404, or redirect loop.
Check Your Robots and CDN Rules
Review the robots.txt file on your site and image CDN. A rule that blocks Googlebot-Image may keep your files out of Google Images.
Some CDN security rules may also block bots or users from other regions. Check the live page in Google Search Console and review its rendered HTML.
Test Lazy-Loaded Images
Google can index lazy-loaded images when it can find the final image URL in the rendered page. Do not make Google scroll, click, or tap before your script loads the image.
Test the page after changing your theme, plugin, or CDN settings. One small update can break image loading without showing a clear error.
Use an Image Sitemap When Needed
Use an image sitemap for script-based galleries, large image libraries, or images that Google struggles to find. It can help Google discover images loaded through JavaScript.
Submit the sitemap through Search Console to check access dates and processing errors. A sitemap helps discovery, but it does not promise indexing or higher rankings.
Fix access problems first, and then submit your sitemap. This is the safest way to make blog images crawlable and indexable.
Use Structured Data and Social Preview Images
Use structured data for blog images to help Google read your page with less guesswork. For a normal blog post, add valid Article or BlogPosting schema and place your main image URL inside the image field.
Choose a large, clear image that shows the true topic of your post. Google says Article schema can help it understand your page and show better images, dates, and titles in supported search results.
However, schema does not push your page higher by itself. It only makes your content eligible for certain rich results, and Google does not promise that it will show them.
Use the schema type that matches the real page:
- Use
BlogPostingfor a blog article. - Use
Recipefor a full recipe. - Use
Productfor a real product page. - Use
VideoObjectwhen video is the main content.
Do not add Product, Recipe, or ImageObject schema just to gain more search space. Your markup must match the content that readers can see on the page.
Also, add an Open Graph image for Facebook, LinkedIn, WhatsApp, and other social previews. Keep one clear featured image with a stable aspect ratio, but remember: og:image controls sharing previews and does not replace image SEO, alt text, compression, or relevant page content.
In simple terms, structured data for blog images adds context; it does not create quality. Test your markup with Google’s Rich Results Test before you publish.
Step 10 — Optimize WordPress Blog Images
To optimize WordPress blog images, set a clear upload size before you add files. Match it to your theme’s widest content area, so you do not upload a 5,000-pixel photo for a 900-pixel space.
Check the Sizes WordPress Creates
WordPress keeps the source file and makes several smaller copies after each upload. Your theme and plugins may add more sizes, so check Settings → Media and upload one test image.
In Gutenberg, choose Medium, Large, or another suitable option instead of Full Size. WordPress has supported responsive images with srcset and sizes since version 4.4, which helps browsers load a suitable file for each screen.
Test One Image Plugin
Use one image optimization plugin, not two plugins that compress the same files. First, test its visual quality, backups, WebP or AVIF output, CDN support, removal steps, and monthly limits.
A plugin can resize, compress, convert, and deliver your images. However, it cannot choose a useful image or write correct alt text for your page.
Review Your Theme
Check that your theme adds width and height, keeps srcset, and does not lazy-load the first large image. Also review old attachment pages: WordPress 6.4 disabled them on new sites because most gave readers little value.
Use This Gutenberg Setup
Upload wordpress-image-seo-settings.webp, then add clear alt text: “WordPress Media settings showing image size fields.” Add a caption only when it gives more context, and select the smallest size that still looks sharp.
Good WordPress image SEO follows one rule: upload less, load the right size, and describe each image for the reader.
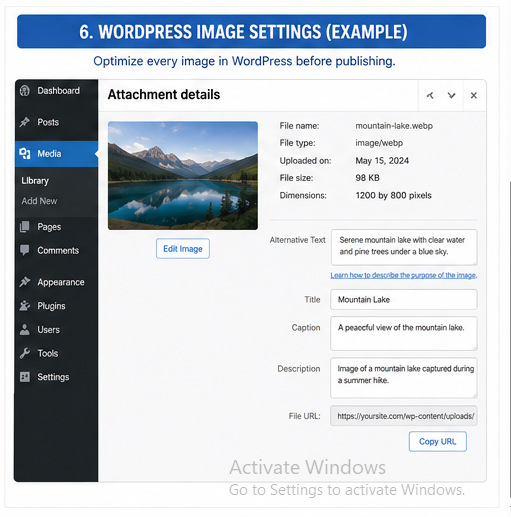
Image SEO Tools: Fastest, Cheapest, and Best Choices
The best image optimization tool for bloggers is not always a paid plugin. Start with free tools, then pay only when image work takes too much time.
Cheapest Choice
Use a browser compressor, PageSpeed Insights, Search Console, and browser developer tools. PageSpeed Insights checks speed, while Search Console shows clicks, impressions, pages, and search terms.
WordPress has added srcset and sizes since version 4.4. So, it may already send smaller images to phones without an extra plugin.
Fastest Choice
For a busy blog, use one trusted WordPress image plugin. It can resize uploads, compress files, and create WebP copies with less work.
An image CDN suits a large site or a worldwide audience. It can resize images on demand and send WebP or AVIF when the browser supports it.
Safest Choice
Keep every original before a bulk image update. Test ten images on a staging site; check text, crops, page layout, and image URLs.
Use settings you can undo, and avoid changing many live image URLs. A small speed gain is not worth broken posts or missing images.
Best Choice for Your Skill Level
- Beginner: Use one compressor, one width preset, WebP, and manual alt text.
- Growing blog: Use one plugin for uploads and old image cleanup.
- Expert: Use build-time processing, CDN rules, responsive breakpoints, LCP image priority, and broken-image alerts.
My view is simple: do not build a large image tool stack. The best image optimization tool for bloggers is the smallest setup you can check, trust, and use each week.
Common Image SEO Mistakes
These common image SEO mistakes can slow your blog, confuse Google, and hurt readers. Fix them before you publish.
- Uploading camera files: Resize photos to the largest size your page shows. A 5,000-pixel photo is wasteful in an 800-pixel column.
- Using the wrong format: Use WebP, AVIF, or JPEG for photos; use PNG for sharp screenshots.
- Stuffing alt text: Describe the image in plain words. Never repeat keywords just to rank.
- Skipping useful alt text: Add it when an image shares facts, steps, or meaning.
- Describing decoration: Use
alt=""for decorative images, so screen readers skip them. - Repeating alt text: Give each useful image its own clear description.
- Forcing keywords into filenames: Name the real subject, such as
wordpress-alt-text-box.webp. - Lazy-loading the hero image: Load your main image at once. Lazy loading may delay Largest Contentful Paint.
- Leaving out dimensions: Add width and height values to stop page jumps.
- Using CSS for key images: Place important visuals in an HTML
<img>tag. - Blocking CDN files: Check robots rules, firewalls, and expiring links.
- Hiding facts inside graphics: Repeat key names, figures, and steps in page text.
- Adding empty stock photos: Use images that show, prove, or explain something.
- Changing URLs without redirects: Keep useful image URLs stable, or redirect old ones.
- Trusting an image sitemap: It helps Google find files; it cannot promise rankings.
- Crushing screenshots: Keep buttons, labels, and small text easy to read.
- Ignoring mobile delivery: Use responsive sizes, so phones do not fetch large desktop files.
- Trusting plugins fully: Plugins can resize and compress files. You must still choose useful images, write honest alt text, and fix these common image SEO mistakes.
How to Audit Existing Blog Images
An image SEO audit helps you find slow, unclear, unsafe, or hidden images. Use the six-gate check below on each key blog post.
Use the Six-Gate Image Check
| Check | Question | Pass condition |
|---|---|---|
| Relevance | Does the image explain the section? | It gives clear value |
| Rights | Can you legally use it? | You own it or have a licence |
| Semantics | Do the filename and alt text make sense? | Both are clear and not copied |
| Performance | Is the image sized and compressed well? | It has no extra file weight |
| Delivery | Does it have set dimensions and responsive sizes? | It loads well on all screens |
| Indexing | Can Google fetch the image? | It has a live URL and <img> tag |
Start with relevance: remove any stock photo that adds no real meaning. Google advises you to use clear images near text that explains them.
Next, check the filename and alt text. Use clear words, but do not repeat the same keyword in every field.
Then, test the file size and display size. A 2,000-pixel image should not load inside a 700-pixel blog column; responsive images and correct dimensions reduce wasted data.
Audit These Pages First
- High-traffic blog posts.
- Pages with poor mobile speed.
- Posts gaining Google Image clicks.
- Image-heavy evergreen guides.
- Sales or affiliate pages.
- Posts you updated this year.
Open Google Search Console and set Search type to Image. You can then find pages receiving image clicks and impressions.
Do not replace every old image at once; fix the pages with the highest value first. A focused image SEO audit gives you faster pages, clearer images, and less wasted work.
How to Measure Whether Image SEO Is Working
You need a clear starting point before you edit any image. This baseline helps you see if your image SEO results improve or fall.
Record Your Starting Data
Pick a group of five to ten similar blog posts. Note each page URL, update date, image size, image format, clicks, views, and LCP score.
Use Google Search Console to record clicks, impressions, search terms, and landing pages. Set the search type to Image when this filter is available; this shows traffic from Google Images.
Compare the Right Results
Check the same pages again after you optimize their images. Compare these points:
- Google Image impressions and clicks.
- Organic clicks to each blog post.
- Image bytes sent to the browser.
- Mobile and desktop image quality.
- Reader time on tutorials and visual guides.
- LCP before and after the update.
Aim for an LCP of 2.5 seconds or less at the 75th percentile. Google classes this range as a good loading experience.
Give Google Time
Google must crawl and process your page again, so results may not change at once. Check progress after two weeks, four weeks, and eight weeks instead of checking each day.
Do not credit every rise or fall to image changes. Content updates, backlinks, rival pages, seasonality, and new search features can also change your traffic.
Keep a Simple Change Log
Record the URL, edit date, old file size, new file size, and image format. Test groups of similar posts; one page can give you a false result.
Your image SEO results are working when pages load faster, image impressions grow, and useful blog posts gain more clicks. Keep changes that improve all three; review changes that improve speed but reduce image quality.
Image SEO for AI Search and Visual Discovery
Image SEO for AI search starts with a simple rule: make each image clear, useful, and easy to understand. There are no proven secret “AI ranking factors,” so focus on helping real people first.
Make the Image Meaning Clear
Use an original image with one clear subject, then place it near text that explains the same topic. Add a short caption, useful alt text, a clear filename, and matching details about the person, place, product, or brand.
Keep the image sharp, fast to load, and open to search crawlers. Avoid hiding key images inside CSS, scripts, or pages that need a login.
Google expanded AI-led Search on May 19, 2026, with stronger reasoning, visual input, and agent-like tasks. This change makes clear page context and machine-readable image details more useful, but Google does not promise that an optimized image will appear in AI Overviews.
Prepare Images for Visual Search
Google’s AI Mode can already answer questions about uploaded images, while visual tools can connect what a person sees with related web content.
Use this simple checklist:
- Show one clear subject.
- Use your own photos, charts, or screenshots.
- Add labels that remain easy to read.
- Keep names and facts consistent.
- Explain the image in nearby text.
- Use accurate alt text and captions.
A February 2026 Pinterest study reported 20% organic traffic growth after it built search-intent descriptions and related image collections across billions of images. That result came from a large Pinterest system, so it is useful evidence—not a promise for your blog.
Do not add hidden keywords, false statistics, or hundreds of near-copy AI images. Strong image SEO for AI search comes from clear meaning, honest context, useful visuals, and files that both people and search tools can access.
Frequently Asked Questions About Image SEO for Blogs
1. What is the best image size for a blog post?
For image SEO for blogs, resize each image to the largest size your page will show. A width of 800–1,200 pixels suits many content areas, but your theme controls the final size.
2. What is the best image format for SEO?
WebP is the best simple choice for most blog photos because it offers good quality with a small file. Use AVIF when it looks better or loads smaller; use PNG for graphics that need sharp text or transparency.
3. Should every blog image have alt text?
Give useful images clear alt text that explains their purpose. Use an empty attribute, alt="", for a purely decorative image so screen readers can skip it.
4. Should I put my keyword in every image alt tag?
No; this looks forced and may make the text less useful. Add a keyword only when it truly describes the image and fits the page topic.
5. Do image filenames affect rankings?
A clear filename helps Google understand the image, but it is only one small signal. Rename IMG_5042.jpg as wordpress-alt-text-field.webp, but never stuff it with keywords.
6. Should alt text and filenames be identical?
No; they serve different jobs. The filename names the file, while alt text explains the image’s meaning within that part of your blog post.
7. Does Google prefer original images?
Google does not promise a ranking boost just because an image is original. Still, your own photos, charts, tests, and screenshots can add value that common stock images cannot.
8. Should I lazy-load my featured image?
Do not lazy-load a featured image when it is the main image visible at the top of the page. Delaying that image can slow Largest Contentful Paint, so load it early instead.
9. How many images should a 2,000-word blog post contain?
There is no fixed SEO number; use an image when it explains, proves, or shows something. Most 2,000-word guides may need three to eight useful images, while a simple opinion post may need only one.
10. Do captions improve image SEO?
Captions help when they add context, explain data, or name the source. Google also uses captions and nearby text to understand an image, so keep them useful rather than repetitive.
11. Can Google index WebP and AVIF?
Yes; Google Images supports both WebP and AVIF. Make sure the filename extension matches the real format, and check that Google can access the image URL.
12. Do I need an image sitemap?
Most small blogs do not need a separate image sitemap when images appear in clear HTML. It can help Google discover images loaded through scripts, galleries, or other complex page systems.
13. Can stock photos rank in Google Images?
Yes; a licensed stock photo can appear in Google Images when Google can crawl it and understand its page context. Yet the same photo may appear on many sites, so it gives your post little visual difference.
14. Is image SEO different for WordPress?
The main rules stay the same, but WordPress can automate image sizes, responsive files, and lazy loading. You must still choose the right image, write honest alt text, compress the file, and check your theme’s output.
15. How long does an optimized image take to appear in Google?
There is no set time; Google must crawl and process the page again. Changes may appear within several days, but some can take a few weeks, and indexing is never guaranteed.
Your image SEO for blogs works best when each image is useful, light, clear, and easy to crawl. Start with the main image, then fix filenames, alt text, file size, and loading settings on your highest-traffic posts.
Start Your Image SEO Audit Today
Good image SEO for blogs starts with three simple steps: use images that help the reader, resize and compress each file, and describe every useful image with clear alt text. These steps improve page speed, access, and Google Image Search visibility without adding extra work to your writing.
Start with one high-traffic post, not your full site. Use our page-speed guide, alt-text guide, WordPress SEO checklist, and Core Web Vitals guide as you work.
Today, audit the featured image and the first three inline images. This small task gives you a fast and practical start with image SEO for blogs.


Leave a Reply