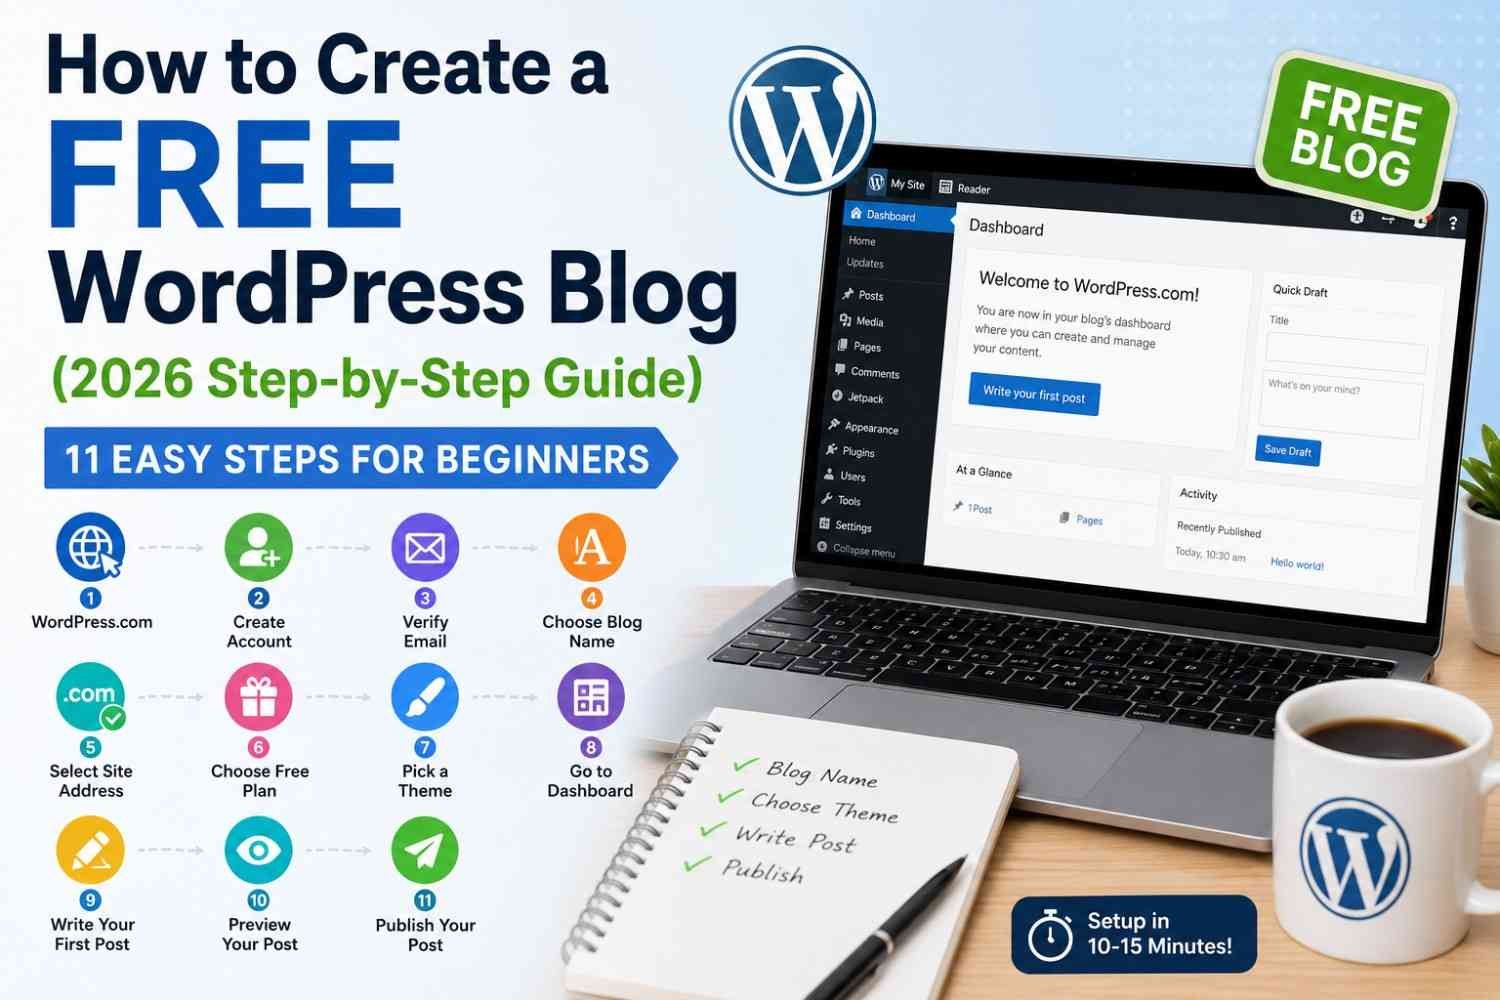
Starting a free WordPress blog is one of the easiest ways to share your ideas, build a personal brand, create a portfolio, or learn blogging without spending money. In 2026, you can launch a blog in less than 15 minutes using WordPress.com’s free plan, which includes hosting, a subdomain, security, automatic updates, and a visual editor.
This guide explains everything you need to know before creating your first WordPress blog. You’ll learn which WordPress platform to choose, what the free plan includes, and what you need before getting started.
Quick Overview
| Feature | Details |
|---|---|
| Cost | Free |
| Time Required | 10–15 minutes |
| Coding Required | No |
| Platform | WordPress.com |
| Hosting Included | Yes |
| Free Domain | yourblog.wordpress.com |
| Storage | 1 GB |
| SSL Certificate | Included |
| Best For | Beginners, students, hobby bloggers, portfolios |
The free plan includes managed hosting, basic SEO features, Jetpack essentials, and unlimited posts and pages, making it ideal for learning and launching a first blog.
Why Choose WordPress?
WordPress powers more websites than any other content management system because it combines simplicity with flexibility. Beginners can publish their first article without coding, while experienced users can later expand the same website into a business site, portfolio, membership platform, or online store.
Many professional bloggers also started with a free WordPress blog before upgrading to a custom domain and paid hosting as their audience grew.
Common reasons people start a free WordPress blog
- Learn blogging without investment
- Build an online portfolio
- Share knowledge or tutorials
- Start a travel, food, finance, or tech blog
- Practice SEO and content writing
- Create a personal website
- Test business ideas before spending money
WordPress.com vs WordPress.org
Many beginners confuse these two platforms. Choosing the right one saves time and avoids unnecessary migration later.
| Feature | WordPress.com | WordPress.org |
|---|---|---|
| Cost to Start | Free | Software is free, but hosting and domain cost extra |
| Hosting | Included | You arrange hosting |
| Setup | Ready in minutes | Manual installation required |
| Security Updates | Automatic | Managed by you |
| Custom Domain | Paid upgrade | Supported |
| Plugin Installation | Paid plans | Full access |
| Best For | Beginners | Growing websites and businesses |
Which one should you choose?
Choose WordPress.com if you:
- are completely new to blogging
- want free hosting
- don’t want technical setup
- simply want to start writing
Choose WordPress.org if you:
- plan to earn serious income
- need complete website control
- want thousands of plugins
- require advanced SEO customization
For this guide, you’ll create your blog using WordPress.com’s Free plan, which includes managed hosting, 1 GB of storage, a free wordpress.com subdomain, basic SEO tools, and security features.
Benefits of Creating a Free WordPress Blog
Even without spending money, you receive enough features to learn blogging and publish high-quality content.
Key benefits
- No hosting costs
- No coding knowledge needed
- Fast setup
- Free SSL certificate
- Mobile-friendly themes
- Automatic software updates
- Built-in website statistics
- Basic SEO features
- Social media sharing tools
- Unlimited blog posts and pages
- Automatic spam protection
- Reliable cloud hosting
The free plan also lets you upgrade later without rebuilding your website, making it a practical starting point for new bloggers.
What You Need Before Creating Your Blog
Prepare these items before starting.
| Requirement | Purpose |
|---|---|
| Email address | Create your account |
| Internet connection | Access WordPress |
| Blog name | Your website identity |
| Username | Login credentials |
| Password | Account security |
| About five minutes | Initial setup |
It also helps to decide your blog niche beforehand. Popular niches include:
- Technology
- Artificial Intelligence
- Personal Finance
- Health
- Food
- Travel
- Education
- Parenting
- Career
- Lifestyle
Choosing one primary niche makes it easier to build authority and attract loyal readers over time.
What Does the Free WordPress Plan Include?
Here’s what you receive without paying anything:
- Free
yourblog.wordpress.comwebsite address - 1 GB media storage
- Unlimited visitors
- Unlimited posts and pages
- Dozens of responsive themes
- Block Editor
- Basic SEO features
- Jetpack security
- Automatic backups of platform infrastructure
- Site statistics
- Community support forums
The free plan displays WordPress.com branding and uses a wordpress.com subdomain. You can connect a custom domain and unlock advanced customization later by upgrading to a paid plan.
Step-by-Step – How to Create a Free WordPress Blog (2026)
Step 1: Visit WordPress.com
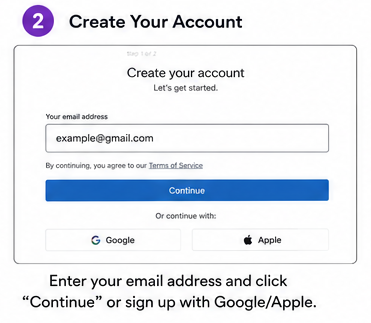
Open your web browser and go to wordpress.com. Click Get Started or Start Your Website to begin creating your free account.
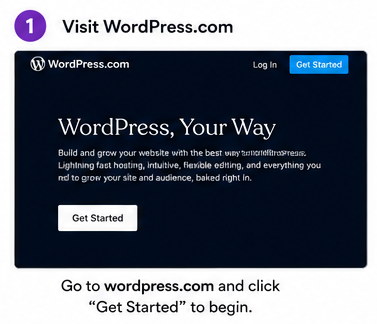
You’ll be asked to enter your email address, create a username, and choose a strong password. You can also sign up using your Google or Apple account for faster registration.
Tip: Use an email address you access regularly because WordPress will send a verification email.
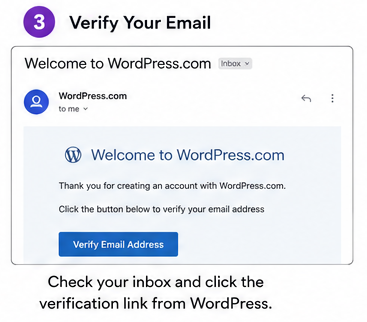
Step 2: Verify Your Email Address
After signing up, check your inbox and click the verification link sent by WordPress.
Email verification activates your account and helps keep it secure. If you don’t see the email, check your Spam or Promotions folder.
Step 3: Choose Your Blog Name
Your blog name appears in your website header and helps visitors recognize your brand.
Choose a name that is:
- Short and easy to remember
- Related to your niche
- Easy to spell
- Future-proof if you expand your content
Good examples
| Niche | Blog Name |
|---|---|
| Technology | TechGuide Daily |
| Food | Home Kitchen Recipes |
| Travel | Explore Every Mile |
| Finance | Smart Money Notes |
| Fitness | Healthy Living Tips |
Don’t worry if you change your mind later. You can update your site title anytime from the WordPress dashboard.

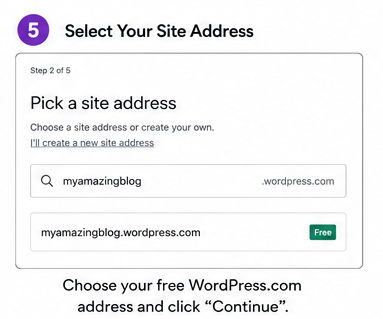
Step 4: Select a Free Website Address
WordPress now asks you to choose your website address (URL).
For the free plan, your address looks like this:
yourblog.wordpress.comFor example:
healthyrecipes.wordpress.comtechwithalex.wordpress.comIf your preferred name is unavailable, try:
- adding your name
- adding your niche
- using simple words
- avoiding numbers whenever possible
Choose the Free option to continue without purchasing a custom domain.
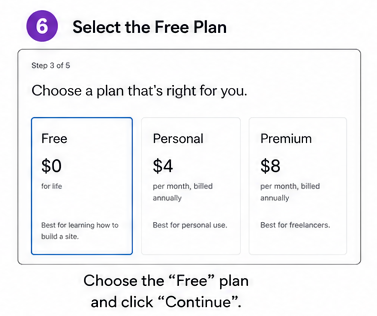
Step 5: Select the Free Plan
WordPress displays several paid plans with additional features.
If your goal is learning or starting a blog without spending money, choose:
Free Plan
It includes:
- Free hosting
- SSL certificate
- 1 GB storage
- Free subdomain
- Security updates
- Responsive themes
- Unlimited posts and pages
You can upgrade later without losing your content.
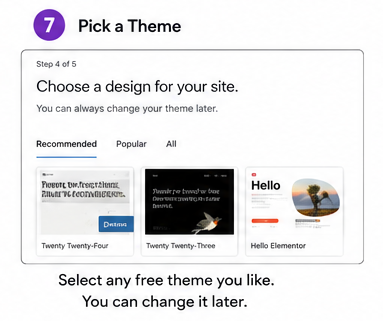
Step 6: Choose a Theme
A theme controls your blog’s appearance, including colors, fonts, layout, and navigation.
Browse the free themes and pick one that matches your niche.
Recommended styles
| Blog Type | Theme Style |
|---|---|
| Personal Blog | Clean and minimal |
| Technology | Modern |
| Food | Image-focused |
| Travel | Large photography |
| Business | Professional |
| Portfolio | Grid layout |
Don’t spend too much time choosing. Every theme can be changed later without deleting your posts.
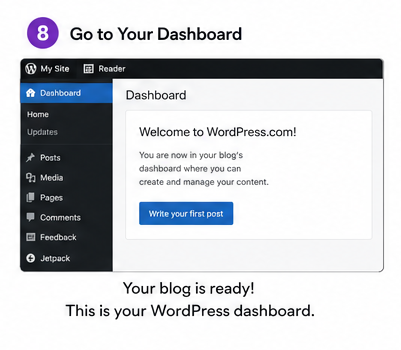
Step 7: Open the WordPress Dashboard
After setup, you’ll enter your dashboard.
This is where you’ll manage everything on your blog.
Main dashboard sections
| Menu | Purpose |
|---|---|
| Posts | Write blog articles |
| Pages | Create About or Contact pages |
| Media | Upload images and videos |
| Appearance | Change themes |
| Settings | Website configuration |
| Comments | Manage reader comments |
Spend a few minutes exploring these sections before publishing your first article.
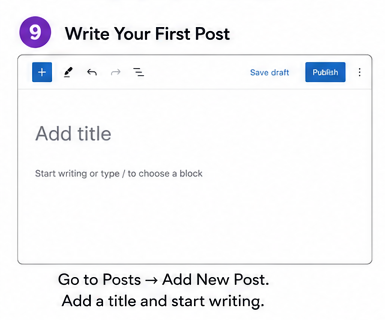
Step 8: Write Your First Blog Post
Click:
Posts → Add New Post
The WordPress Block Editor opens.
Add:
- Title
- Introduction
- Headings
- Images
- Lists
- Tables
- Links
Use short paragraphs and descriptive headings to improve readability.
Example:
Title:
10 Easy Breakfast Ideas for Busy Mornings

Introduction

Heading 1

Heading 2

Conclusion
The Block Editor lets you add text, images, videos, buttons, quotes, and tables without writing code.
Step 9: Add Images
Images make articles easier to read and improve engagement.
Click the + button inside the editor and select:
Image
You can upload pictures from your computer or choose images already stored in your media library.
Image tips
- Use high-quality images.
- Compress large files for faster loading.
- Add descriptive alt text.
- Use relevant images instead of decorative ones.
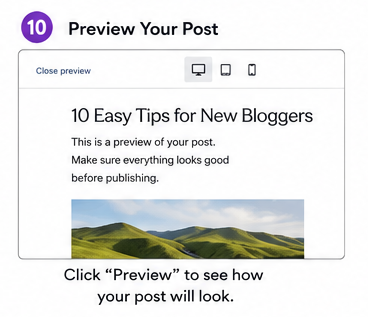
Step 10: Preview Your Blog
Before publishing, click Preview.
Check:
- Spelling
- Formatting
- Mobile layout
- Images
- Headings
- Links
Reading your article once before publishing helps catch small mistakes that affect the reader’s experience.
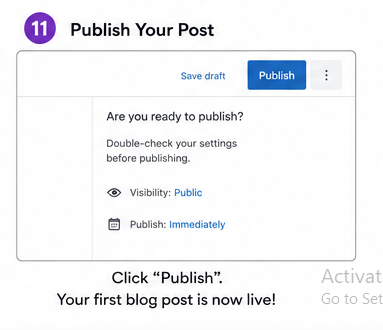
Step 11: Publish Your First Blog
When you’re satisfied, click:
Publish
WordPress asks for confirmation.
Click Publish again.
Your first blog post is now live and accessible through your website address.
Congratulations—you’ve officially started your WordPress blog.
Essential Settings to Complete After Publishing
Before writing more articles, spend a few minutes configuring your blog.
1. Update Your Site Title
Go to:
Settings → General
Enter:
- Site Title
- Tagline
These appear in search results and browser tabs.
2. Create Important Pages
Every blog should include these pages:
- About
- Contact
- Privacy Policy
As your blog grows, you can also add:
- Disclaimer
- Terms and Conditions
- Affiliate Disclosure
These pages improve trust and are useful for search engines and advertising programs.
3. Customize Your Homepage
Choose whether visitors first see:
- Your latest blog posts, or
- A static homepage
For most new blogs, displaying the latest posts is the simplest option.
4. Enable Comments (Optional)
Reader comments encourage discussion and build community.
If you don’t want comments, you can disable them from the discussion settings.
Common Beginner Mistakes to Avoid
Many new bloggers make the same mistakes during setup.
Avoid these from the beginning:
- Choosing a complicated blog name
- Changing themes too often
- Publishing without proofreading
- Ignoring image optimization
- Writing without clear headings
- Using copied content
- Expecting instant traffic
- Creating too many unrelated categories
Consistency matters more than publishing dozens of articles in your first week.
Quick Checklist Before You Start Blogging
✅ Verified email address
✅ Selected the Free WordPress plan
✅ Chosen a memorable blog name
✅ Picked a responsive theme
✅ Customized your site title
✅ Created About and Contact pages
✅ Published your first blog post
✅ Previewed your blog on mobile and desktop
A blog that looks professional and follows basic SEO practices is easier to read, easier to find in search engines, and more likely to attract returning visitors. Spend a little time customizing your site before publishing dozens of articles.
Customize Your WordPress Blog
Customization helps create a consistent brand and improves the reader’s experience.
Change Your Site Identity
Go to:
Appearance → Editor or Settings → General
Update:
- Site Title
- Tagline
- Site Icon (Favicon)
- Time Zone
- Language
Your site title should clearly describe your blog. A short tagline explains what readers can expect.
Create a Simple Navigation Menu
A clean menu helps visitors find important pages quickly.
Include these pages:
- Home
- Blog
- About
- Contact
- Privacy Policy
Avoid adding too many menu items. Five or six links are enough for most new blogs.
Customize Colors and Fonts
Choose readable fonts and simple colors.
Follow these guidelines:
| Element | Recommendation |
|---|---|
| Font Size | 16–18 px |
| Heading Font | Bold and clear |
| Background | White or light colors |
| Text Color | Dark gray or black |
| Accent Color | One primary brand color |
Good readability keeps visitors on your website longer.
Add Useful Widgets
Widgets improve navigation without making your site look crowded.
Useful widgets include:
- Search
- Recent Posts
- Categories
- Archives
- Social Links
- Newsletter Signup (available on supported plans)
Place only the widgets your readers will actually use.
Basic SEO for a Free WordPress Blog
Search Engine Optimization (SEO) helps search engines understand your content.
Even on the free WordPress plan, you can follow strong SEO practices.
1. Choose One Main Keyword
Before writing, decide the keyword your article should rank for.
Examples:
- how to create a free wordpress blog
- wordpress blogging for beginners
- free wordpress website
Use the keyword naturally in:
- Title
- First paragraph
- One or two headings
- Meta description (if available on your plan)
- Image alt text
- Conclusion
Don’t repeat it unnecessarily.
2. Write Helpful Content
Google rewards content that answers real questions.
Every article should:
- solve one problem
- answer common questions
- include examples
- stay accurate
- remain easy to scan
Quality matters more than word count.
3. Use Proper Headings
Organize every article with headings.
Example:
H1
Main Title

H2
Step 1

H2
Step 2

H3
Extra Tips
Clear headings improve readability for both readers and search engines.
4. Optimize Images
Large images slow down websites.
Before uploading:
- Resize images
- Compress files
- Use descriptive filenames
- Add meaningful alt text
Example:
Good:
free-wordpress-blog-dashboard.jpgPoor:
IMG4589.jpg5. Link Related Articles
Internal links help readers discover more content.
Example:
If you write about WordPress themes, link to another article about blogging tips or SEO.
This also helps search engines understand your website structure.
Writing Your First Successful Blog Posts
Many beginners focus on publishing frequently instead of publishing useful content.
A few well-written articles often perform better than dozens of low-quality posts.
Follow a Simple Structure
Every article should include:
- Clear title
- Short introduction
- Main sections
- Examples
- Summary
- Frequently Asked Questions
- Conclusion
Readers should find answers without scrolling through unnecessary text.
Write for One Audience
Avoid writing about unrelated topics.
Examples:
Technology Blog
- AI
- Gadgets
- Software
- Programming
Food Blog
- Recipes
- Cooking Tips
- Nutrition
Focused websites build topical authority faster than blogs covering random subjects.
Publish Consistently
A realistic publishing schedule is more effective than posting every day for one week and then stopping.
Example schedule:
| Frequency | Articles Per Month |
|---|---|
| Weekly | 4 |
| Twice Weekly | 8 |
| Three Times Weekly | 12 |
Consistency helps build reader trust and creates a steady library of content.
Tips to Grow Your Blog Faster
Growth doesn’t happen overnight, but these habits can help you build momentum.
Focus on Long-Tail Keywords
Instead of targeting broad topics like:
WordPressWrite about:
How to create a free WordPress blog for beginners

How to start a food blog on WordPress

Best free WordPress themes for travel blogs
Long-tail keywords are usually easier to rank for and attract readers with specific questions.
Answer Real Questions
Think about what beginners search for.
Examples:
- How do I create a blog?
- Can I blog for free?
- Which WordPress plan should I choose?
- How do I get visitors?
Each question can become a separate blog post.
Keep Updating Older Posts
Refreshing existing content often takes less time than writing new articles.
Update:
- Statistics
- Screenshots
- Broken links
- New features
- Step-by-step instructions
Fresh content remains more useful for readers.
Share Your Content
Publishing alone won’t bring many visitors.
Share articles on:
- X
- Reddit (where appropriate)
- Relevant online communities
Focus on helping people rather than simply promoting links.
Learn from Analytics
WordPress provides basic site statistics, and you can connect analytics tools as your blog grows.
Monitor:
- Popular posts
- Visitor locations
- Traffic sources
- Search terms
- Top-performing pages
Use these insights to create more content your audience wants.
Common Mistakes New Bloggers Should Avoid
Avoid these habits from the beginning:
- Publishing copied content
- Ignoring spelling and grammar
- Choosing misleading titles
- Using too many categories
- Writing without keyword research
- Forgetting internal links
- Uploading oversized images
- Giving up after a few weeks
Successful blogs usually grow through consistent improvement, not overnight success.
Quick Success Checklist
Before publishing each article, ask yourself:
✅ Does the title clearly explain the topic?
✅ Does the introduction answer the reader’s question?
✅ Are headings easy to scan?
✅ Have I added relevant images?
✅ Are there internal links?
✅ Did I proofread the article?
✅ Does the content provide genuine value?
Following this checklist helps you create articles that readers enjoy and search engines can understand.
Free WordPress Plan Limitations
The free WordPress.com plan is excellent for learning and personal blogging, but it has a few restrictions that become noticeable as your website grows.
| Feature | Free Plan | Paid Plans |
|---|---|---|
| Custom Domain | ❌ No | ✅ Yes |
| Website Address | yourblog.wordpress.com | Your own domain |
| Storage | 1 GB | More storage |
| Install Plugins | ❌ No | ✅ Supported on eligible plans |
| Premium Themes | Limited | Full access |
| Advanced SEO Tools | Limited | Available |
| Monetization Options | Limited | Expanded options |
| Remove WordPress.com Ads | ❌ No | ✅ Yes |
| Advanced Customization | Limited | Full control |
These limitations don’t prevent you from learning WordPress or building an audience. Many bloggers start with the free plan and upgrade only when they need additional features.
When Should You Upgrade?
There’s no need to upgrade immediately. Move to a paid plan when your blog starts growing or your goals change.
Consider upgrading if you want to:
- Use your own domain name
- Build a professional business website
- Install plugins
- Access premium themes
- Improve SEO with advanced tools
- Increase storage space
- Remove WordPress.com advertisements
- Sell products or services
- Monetize your blog more effectively
For most beginners, the free plan is enough during the first several months of blogging.
Frequently Asked Questions
Is WordPress free?
Yes. WordPress.com offers a free plan that includes hosting, security, SSL, and a wordpress.com subdomain. The open-source WordPress.org software is also free, but you must purchase your own hosting and domain.
Can I earn money from a free WordPress blog?
Yes, although earning options are more limited than on paid plans. Many bloggers first build an audience on the free plan and upgrade later to unlock additional monetization features.
Do I need coding knowledge?
No. WordPress uses a visual Block Editor that lets you create pages and blog posts without writing code.
Can I change my theme later?
Yes. You can switch themes at any time without deleting your blog posts or pages, although you may need to adjust menus or widgets after changing themes.
Is WordPress good for beginners?
Yes. Its guided setup, visual editor, automatic updates, and managed hosting make it one of the easiest blogging platforms for beginners.
How long does it take to create a free WordPress blog?
Most people can create a blog and publish their first post in 10–15 minutes.
Can I move from WordPress.com to WordPress.org later?
Yes. Many bloggers start with WordPress.com and migrate to a self-hosted WordPress.org website when they need more control and advanced features.
Which niche is best for a new blog?
Choose a topic you know well and can write about consistently. Popular evergreen niches include:
- Technology
- Artificial Intelligence
- Personal Finance
- Health
- Food
- Travel
- Education
- Parenting
- Career
- Lifestyle
A focused niche usually performs better than covering many unrelated topics.
Final Thoughts
Creating a free WordPress blog is one of the simplest ways to begin publishing online. You don’t need coding skills, web hosting, or a large budget to share your ideas with the world.
Start with the free plan, choose a clear niche, publish helpful articles regularly, and learn basic SEO from the beginning. As your traffic and experience grow, you can upgrade to a custom domain and advanced features without rebuilding your website. Consistent, high-quality content remains the most important factor for long-term blogging success.
Key Takeaways
- Create a free blog in about 15 minutes.
- WordPress.com includes hosting, SSL, and security.
- Choose a simple, memorable blog name.
- Focus on one niche to build authority.
- Publish useful, original content consistently.
- Apply basic SEO to every article.
- Optimize images and use clear headings.
- Upgrade only when your blog needs more features.