In previous post, we have created Hostinger website, from this post, you will learn how to create website in Bluehost.
Creating your own website has never been easier. Whether you want to start a blog, build a business website, create an online portfolio, or launch an eCommerce store, Bluehost provides everything you need to get started in one place.
You don’t need coding skills or previous experience. Bluehost simplifies the process by combining web hosting, domain registration, WordPress installation, and website management into a beginner-friendly platform.
In this guide, we’ll create a real website called How To You Blog using the domain howtoyoublog.com. You’ll learn every essential step—from choosing a hosting plan to launching your website—while avoiding common mistakes that many beginners make.
By the end of this tutorial, you’ll have a fully functional WordPress website that’s ready to publish and grow.
Before You Begin
Before purchasing hosting, spend a few minutes planning your website. This will help you make better decisions during setup and keep your website organized from the beginning.
Ask yourself:
- What is the purpose of your website?
- Who is your target audience?
- What type of content will you publish?
- Which pages do you need at launch?
For this tutorial, we’ll build a blogging website called How To You Blog with the following pages:
- Home
- Blog
- About
- Contact
- Privacy Policy
You can always expand your website later as your content grows.
Step 1: Choose the Right Bluehost Hosting Plan
Visit Bluehost and click Get Started to compare the available hosting plans.
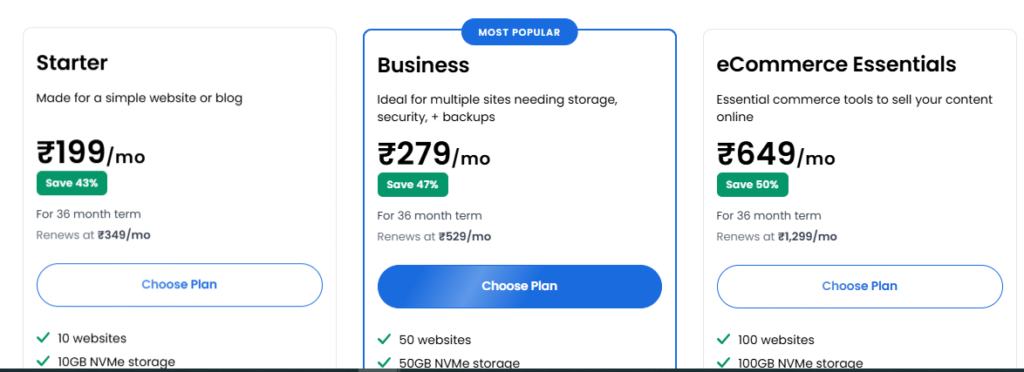
Each plan includes different resources, storage, and features. If you’re creating your first website, a shared hosting plan is usually the most practical option because it’s affordable and easy to manage.
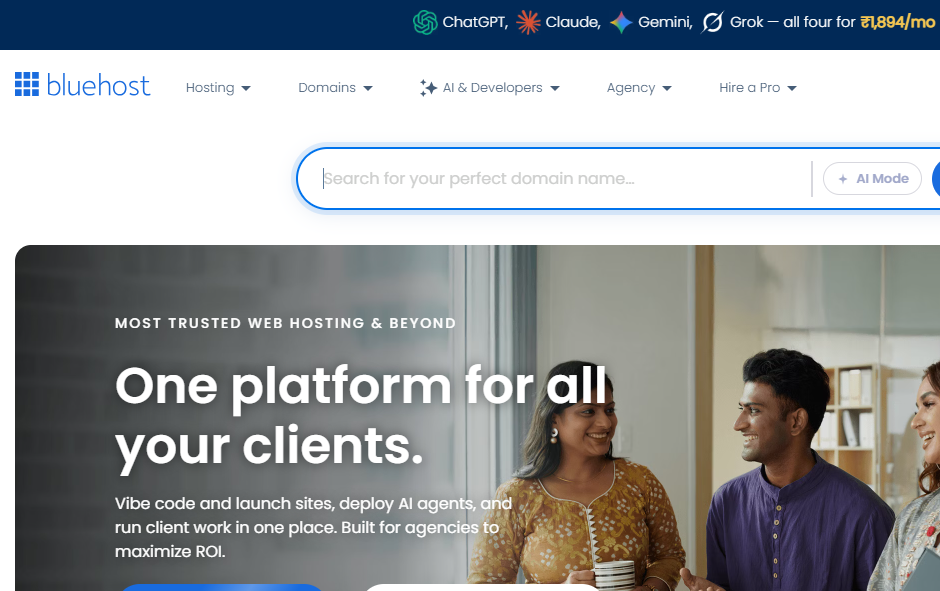
While comparing plans, consider:
- Number of websites you can host
- Storage capacity
- Website performance
- Security features
- Domain registration
- Email accounts
- Backup options
Avoid choosing a plan based only on price. Select one that matches your current needs while leaving room for future growth.
For our example website, How To You Blog, a beginner shared hosting plan is more than enough.
Step 2: Register Your Domain Name
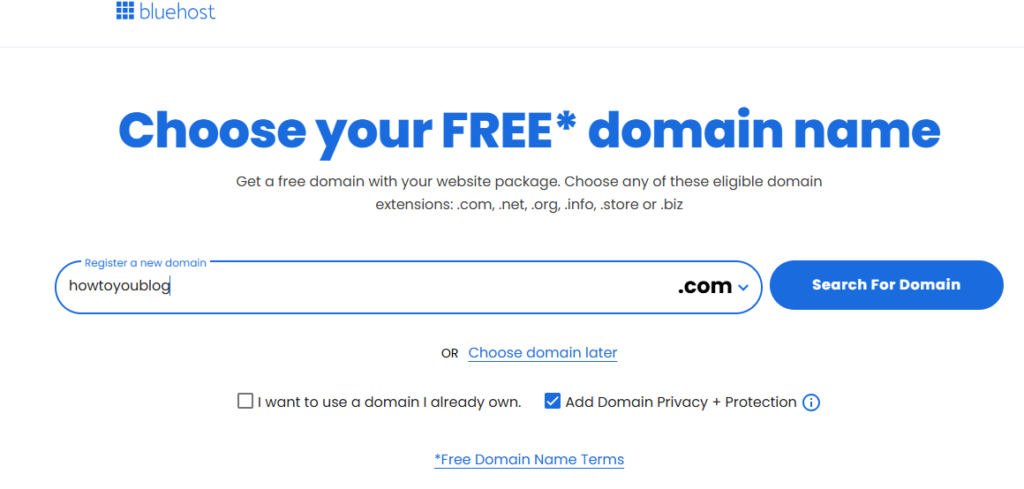
After selecting your hosting plan, Bluehost will ask you to register a domain name.
We’ll use:
howtoyoublog.com
A good domain name should be:
- Short
- Easy to remember
- Easy to spell
- Relevant to your website
If your preferred domain isn’t available, try a shorter variation or a different extension that still represents your brand.
Since changing your primary domain later can be inconvenient, spend a little extra time choosing a name you’ll be happy with for years.
Step 3: Create Your Bluehost Account and Complete Checkout
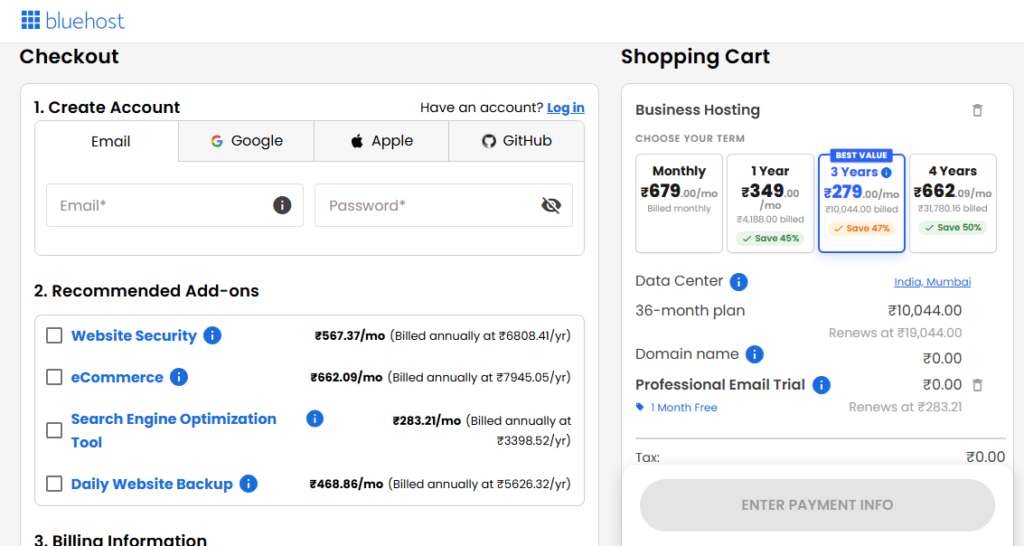
Next, create your Bluehost account by entering your:
- Full name
- Email address
- Country
- Password
Use an email address that you access regularly because Bluehost will send important account information, purchase confirmations, and password recovery emails to it.
Before completing your purchase, review your order carefully.
Verify:
- Selected hosting plan
- Domain name
- Billing period
- Optional add-ons
- Final payment amount
Bluehost may offer additional services such as domain privacy, website backups, malware protection, or professional email. Read each option carefully and choose only the services you actually need.
Once you’ve confirmed everything, enter your payment details and complete the purchase.
After your payment is successful, Bluehost will create your hosting account and send a confirmation email with login instructions.
Step 4: Create Your Website
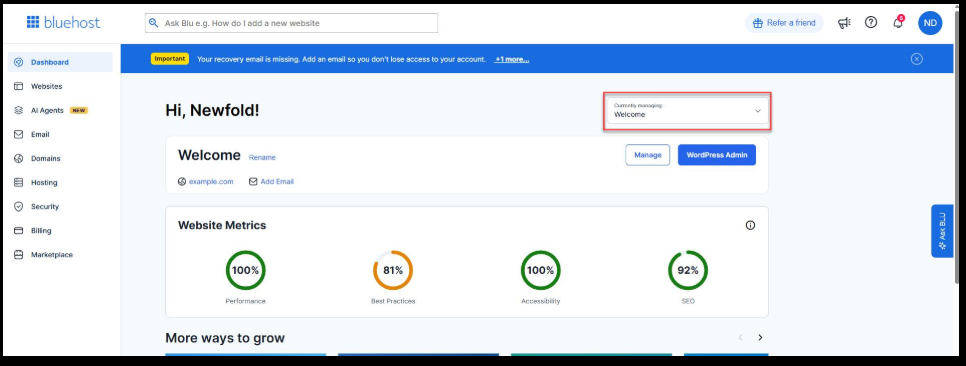
After activating your Bluehost account, sign in to your dashboard. This is where you’ll manage your hosting, domains, websites, and account settings.
Open the Websites section and choose the option to create a new website.
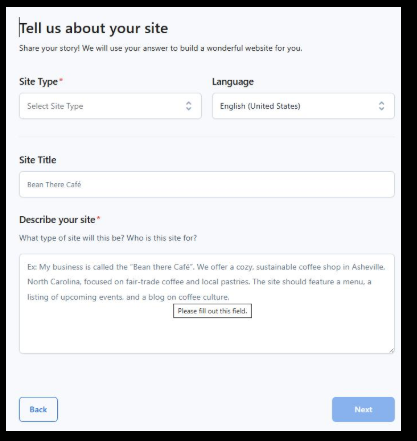
You’ll be asked to enter a few basic details about your website, including its name and tagline.
For this tutorial, use:
Website Name
How To You Blog
Tagline
Simple Blogging Tips for Beginners
Don’t worry if you change your mind later. Both the website name and tagline can be updated from your WordPress settings.
Depending on the current onboarding experience, Bluehost may also offer its AI Website Builder. If you prefer to learn WordPress and have complete control over your website, continue with the standard WordPress setup. If you want a quick starting point, the AI builder can generate an initial design that you can customize later.
Step 5: Install WordPress
WordPress is the content management system (CMS) that powers your website.
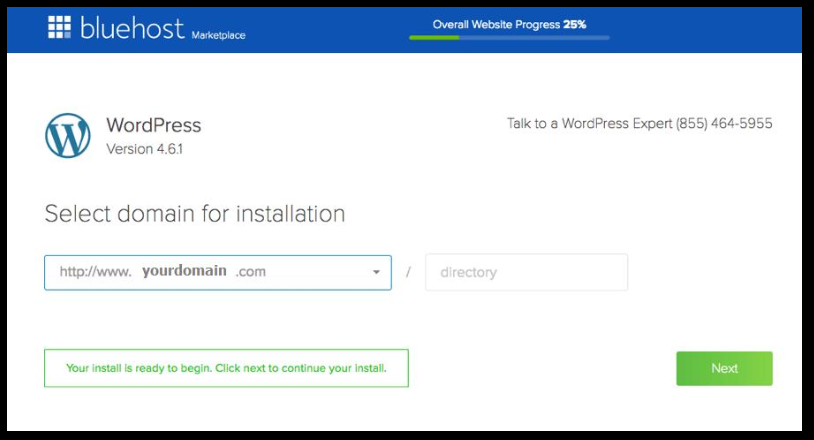
Bluehost automatically installs WordPress for most new websites, so you usually won’t need to install it manually.
During setup, create your administrator account.
Choose:
- A unique username
- A strong password
- A valid email address
Avoid using admin as your username because it’s commonly targeted in automated login attempts.
After the installation is complete, Bluehost will provide your WordPress login page.
It typically follows this format: https://howtoyoublog.com/wp-admin.
Bookmark this URL because you’ll use it whenever you want to log in and manage your website.
Step 6: Explore the WordPress Dashboard
After logging in, you’ll see the WordPress dashboard. Think of it as the control center for your website.
The left-hand menu contains everything you’ll use to build and manage your site.
The most important sections are:
| Section | Purpose |
|---|---|
| Posts | Publish blog articles |
| Pages | Create static pages like About and Contact |
| Media | Upload images, videos, and other files |
| Appearance | Manage themes, menus, and widgets |
| Plugins | Add new features |
| Users | Manage user accounts |
| Settings | Configure website options |
You don’t need to master every menu immediately. Start with the basics, and you’ll become more comfortable as you use WordPress.
Step 7: Configure Basic WordPress Settings
Before customizing your website, review a few important settings.
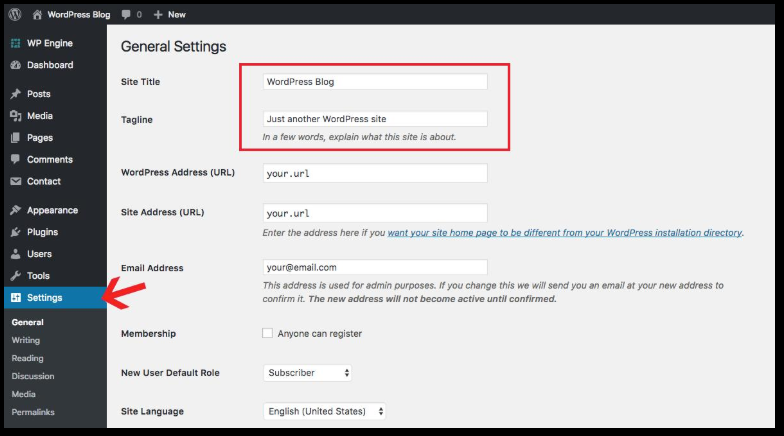
Go to Settings → General and update:
- Site Title
- Tagline
- Administrator Email
- Time Zone
For our example:
Site Title
How To You Blog
Tagline
Helping Beginners Build Better Blogs
Next, open Settings → Permalinks and choose the Post Name structure.
Instead of a web address like: https://howtoyoublog.com/?p=123`.
your posts will use clean URLs such as:https://howtoyoublog.com/how-to-start-a-blog.
Simple, descriptive URLs are easier for visitors to read and help search engines understand your content.
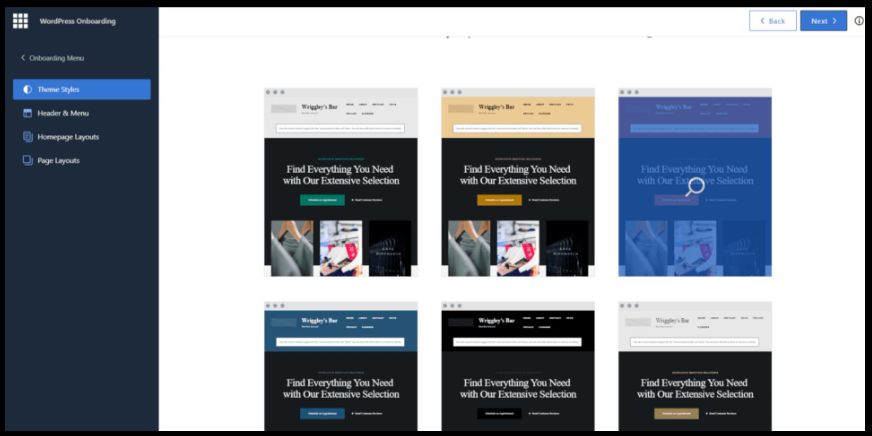
Step 8: Choose a WordPress Theme
A theme controls the design and layout of your website.
WordPress offers thousands of free and premium themes, but choosing the right one is more important than choosing the most visually impressive one.
Look for a theme that is:
- Mobile responsive
- Fast loading
- Regularly updated
- Easy to customize
- Compatible with the latest version of WordPress
For a blogging website like How To You Blog, a clean and lightweight theme is usually the best choice because it keeps the focus on your content.
After activating your theme, customize it by adding:
- Your logo
- Site icon (favicon)
- Brand colors
- Header image (optional)
- Navigation menu
Aim for a clean, consistent design that makes it easy for visitors to navigate your website.
Step 9: Install Essential Plugins
Plugins add new features to your WordPress website without requiring any coding.
It’s tempting to install many plugins, but doing so can slow down your website and make maintenance more difficult.
For most beginners, these plugin categories are enough:
- SEO
- Contact forms
- Security
- Website backups
- Performance optimization
- Spam protection
Before installing any plugin, check:
- User ratings
- Number of active installations
- Update frequency
- Compatibility with your version of WordPress
Keeping only the plugins you actively use helps improve your website’s speed, stability, and security.
Step 10: Create Your Essential Pages
Every website should include a few core pages before it goes live.
For How To You Blog, create:
- Home
- Blog
- About
- Contact
- Privacy Policy
If your website includes affiliate links, sponsored content, or advertising, you should also create:
- Affiliate Disclosure
- Disclaimer
- Terms and Conditions
Once your pages are ready, organize them into a simple navigation menu.
A typical menu might include:
Home | Blog | About | Contact
Avoid overcrowding your navigation with too many links. A simple menu helps visitors find information quickly and creates a better browsing experience.
At this stage, your website is fully built. In the next section, we’ll optimize it for search engines, connect Google Search Console and Analytics, improve speed and security, and prepare your website for launch.
Step 11: Optimize Your Website for Search Engines
Building your website is only the beginning. If you want people to find your content through search engines like Google, you need to optimize your website from day one.
Start by installing a trusted SEO plugin. During the initial setup, you’ll be guided through basic configuration, including your website name, organization details, XML sitemap, and search appearance.
When creating pages and blog posts, follow these SEO best practices:
- Write clear, descriptive page titles.
- Add a unique meta description for every page.
- Use short, readable URLs.
- Organize content with headings (H2 and H3).
- Add internal links to related articles.
- Use descriptive image file names and alt text.
For example, instead of uploading an image named:
IMG_001.jpg
rename it to something meaningful like:
bluehost-wordpress-dashboard.webp
This makes your content easier for search engines to understand and improves accessibility for visitors using screen readers.
SEO is an ongoing process. Focus on publishing helpful, well-organized content rather than trying to optimize for every keyword at once.
Step 12: Connect Google Search Console and Google Analytics
Once your website is live, connect it to Google’s free webmaster tools.
Google Search Console
Google Search Console helps you monitor how your website appears in Google Search.
After verifying ownership of your domain, submit your XML sitemap. This helps Google discover and index your pages more efficiently.
Search Console also lets you:
- Check which pages are indexed.
- Identify crawling errors.
- View search queries.
- Monitor keyword performance.
- Request indexing for newly published content.
Review your reports regularly so you can identify and fix issues early.
Google Analytics
Google Analytics shows how visitors interact with your website.
You’ll be able to see:
- Number of visitors.
- Most popular pages.
- Traffic sources.
- Visitor locations.
- Devices used.
- Average engagement.
These insights help you understand which content resonates with your audience and where you can improve.
Step 13: Improve Website Speed and Security
A fast, secure website creates a better experience for visitors and is easier to maintain over time.
Improve Website Speed
To keep your website loading quickly:
- Compress images before uploading them.
- Use modern image formats such as WebP where possible.
- Install only the plugins you need.
- Choose a lightweight WordPress theme.
- Enable caching if your hosting or plugin supports it.
Remember that speed is about providing a smooth experience for visitors, not chasing a perfect performance score.
Protect Your Website
Good security starts with simple habits.
Make sure you:
- Use strong passwords.
- Keep WordPress updated.
- Update themes and plugins regularly.
- Remove unused plugins and themes.
- Create regular backups.
- Enable two-factor authentication if available.
A few minutes of maintenance each month can prevent many common website problems.
Step 14: Launch Your Website
Before sharing your website, perform one final review.
Check that:
- Every page loads correctly.
- Navigation menus work properly.
- Images display as expected.
- Contact forms send messages successfully.
- Internal links point to the correct pages.
- Your website looks good on desktop, tablet, and mobile devices.
Once everything has been tested:
- Submit your sitemap through Google Search Console.
- Publish your first blog post.
- Share your website with your audience.
- Continue adding useful content consistently.
Congratulations! Your website is now live.
Step 15: Maintain and Grow Your Website
Launching your website is an exciting milestone, but it’s only the beginning.
To keep your website running smoothly:
- Update WordPress, themes, and plugins regularly.
- Publish new content consistently.
- Review Google Search Console for any issues.
- Monitor Google Analytics to understand visitor behavior.
- Test important forms and links.
- Create regular backups before making significant changes.
As your website grows, you’ll naturally improve your content, design, and SEO strategy. Small, consistent improvements are more effective than making major changes all at once.
Common Beginner Mistakes to Avoid
Many first-time website owners encounter the same challenges. Avoiding these mistakes will save you time and frustration.
- Choosing a domain name that’s difficult to remember or spell.
- Installing too many plugins.
- Ignoring WordPress and plugin updates.
- Publishing content without proofreading.
- Forgetting to create backups.
- Expecting immediate Google rankings after launching.
Building a successful website takes time. Focus on creating helpful content, maintaining your website, and learning from your results.
Frequently Asked Questions
Is Bluehost good for beginners?
Yes. Bluehost offers a beginner-friendly setup process and integrates well with WordPress, making it a practical choice for first-time website owners.
Can I build a website without coding?
Yes. WordPress allows you to create pages, publish blog posts, customize themes, and install plugins without writing code.
Can I change my WordPress theme later?
Yes. You can switch themes whenever you like. Before making major changes, create a backup to ensure you can restore your website if needed.
How long does it take to create a website?
Most beginners can complete the initial setup in a few hours. Building a successful website with valuable content is an ongoing process.
When will my website appear in Google Search?
After submitting your sitemap through Google Search Console, Google may take several days or weeks to crawl and index your pages. The exact timing varies for every website.
Conclusion
Creating a website with Bluehost is straightforward when you follow each step in order. From choosing a hosting plan and registering your domain to installing WordPress and publishing your first content, you’ve built a solid foundation for your online presence.
Using our example website, How To You Blog, you’ve learned how to:
- Choose the right Bluehost hosting plan.
- Register a domain name.
- Complete your Bluehost account setup.
- Install and configure WordPress.
- Customize your website.
- Set up basic SEO.
- Connect Google Search Console and Google Analytics.
- Improve website speed and security.
- Launch your website with confidence.
Your website doesn’t have to be perfect on the first day. Keep publishing valuable content, monitor your website’s performance, and continue learning as you grow. Over time, those consistent efforts will help you build a website that attracts visitors and supports your goals.



Leave a Reply