From this post, you will learn creating website in Hostinger with clear steps. If you select Bluehost, that is also i covered with step by step method for setting up Bluehost website, or blog.
Creating a website no longer requires you to write every line of code or manage a server manually. A hosting account, a domain name, and a content management system such as WordPress are enough to build a useful blog or small-business website. The technical work still matters, but modern hosting dashboards organise it into guided steps that beginners can complete one at a time.
This guide uses howtoyoublog.com as the example project. The goal is a clean WordPress blog with a secure domain, a lightweight design, essential pages, basic search measurement, reliable backups, and a launch checklist. The process applies to many personal blogs, portfolio sites, service websites, and early-stage content projects.
You will move through the project in a practical order: first decide what you need, then buy hosting, register or connect the domain, install WordPress, configure the site, add a theme and a small set of plugins, create the main pages, secure the installation, connect Google tools, test performance, and publish. Keeping this order prevents a common beginner problem: designing pages before the technical foundation is ready.
What you need before starting
· A working email address for account and recovery messages.
· A domain idea and one or two alternatives in case the first choice is unavailable.
· A payment method accepted in your country.
· A secure password manager or another safe place to store credentials.
· A simple plan for the website’s purpose, audience, and first few pages.
Keep the first version small. A homepage, blog, About page, Contact page, and legal pages are enough for launch. Add complex features only after the basic site is stable.
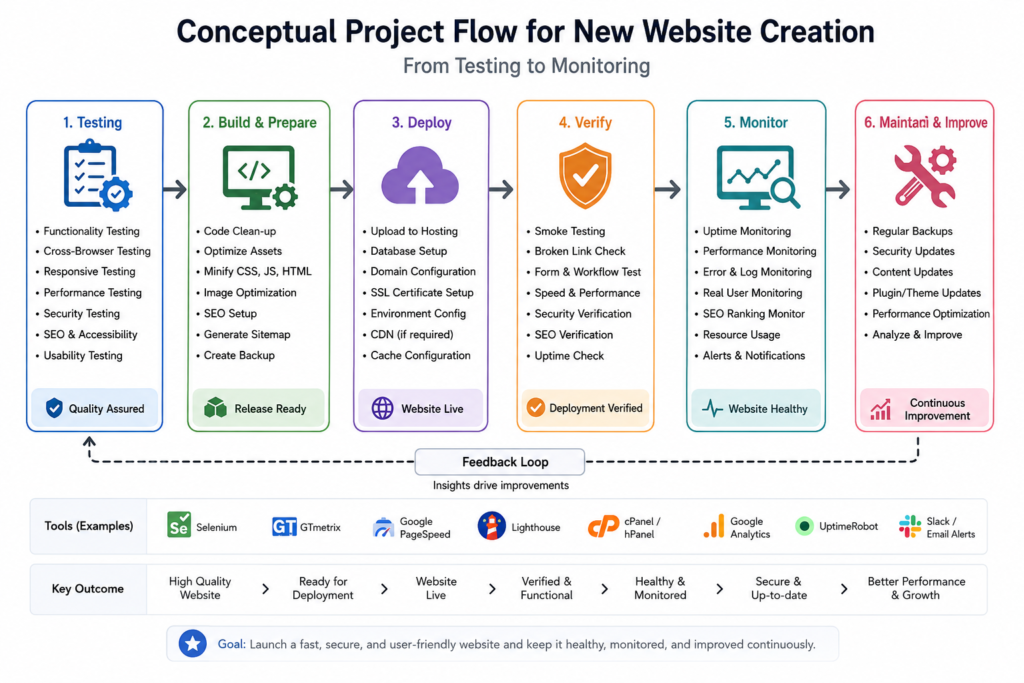
Figure 1. project flow from testing to monitoring.
2. Choose a Hostinger Plan Without Overbuying
Hosting plans are bundles of server resources, management tools, and support features. The correct plan is not automatically the most expensive one. A new blog usually needs dependable WordPress hosting, SSL support, enough storage for images, a sensible backup schedule, and room for normal traffic. Features such as multiple websites, staging, daily backups, or advanced performance tools become more important when you manage several sites or depend on the website for revenue.
Plan names and limits can change. Compare the current checkout page rather than relying on an old review. Focus on what the plan includes today, what renewals may cost, how many websites it supports, how backups work, whether email is included, and whether you can upgrade later without rebuilding the site.
| Question | Why it matters |
| How many websites will you run? | A single-site plan may be enough now; multiple-site support helps future projects. |
| How often are backups created? | Frequent publishing or ecommerce usually deserves a shorter backup interval. |
| Is email included? | A domain mailbox can make the site look more professional. |
| What happens at renewal? | Introductory and renewal prices may differ. |
| Is WordPress managed? | Managed tools can simplify updates, caching, staging, and support. |
A sensible beginner decision
For a first content website, select the lowest plan that meets your real requirements and offers a clear upgrade path. Avoid paying for server resources you cannot yet use, but do not choose a plan that blocks important basics such as SSL or backups. If the project will host several blogs, receive frequent updates, or run important campaigns, the next tier may save time later.
Check the current plan page. This guide intentionally avoids promising a fixed storage limit, number of websites, or backup frequency because those details can change by country, promotion, and product tier.
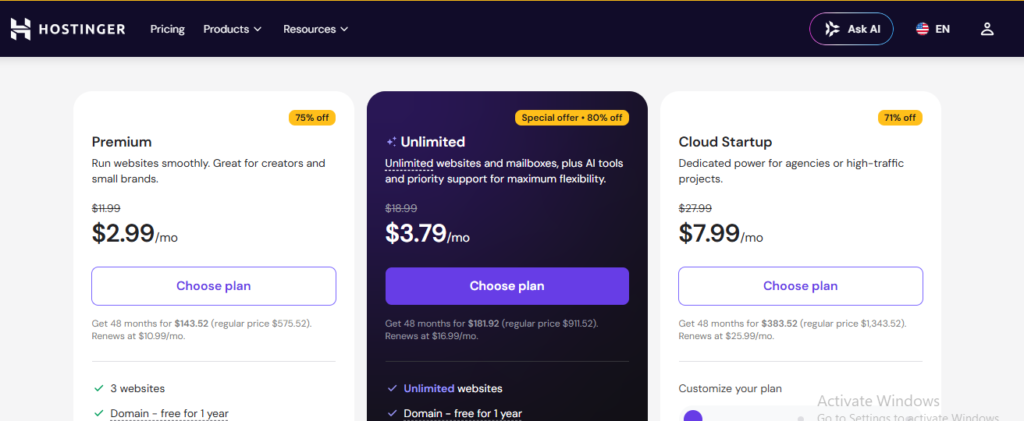
Figure 2. Conceptual hosting-plan comparison.
3. Buy Hosting and Register the Domain
Step 1: Create the account
Open Hostinger’s website, choose the relevant hosting category, and start the order. Use an email address you control because billing notices, security alerts, password recovery, and account verification may depend on it. Create a unique password and enable two-factor authentication when the option becomes available.
1. Enter your email address or use an available sign-in provider.
2. Create a strong, unique password.
3. Confirm the account through the verification message if requested.
4. Save the account details in a password manager.
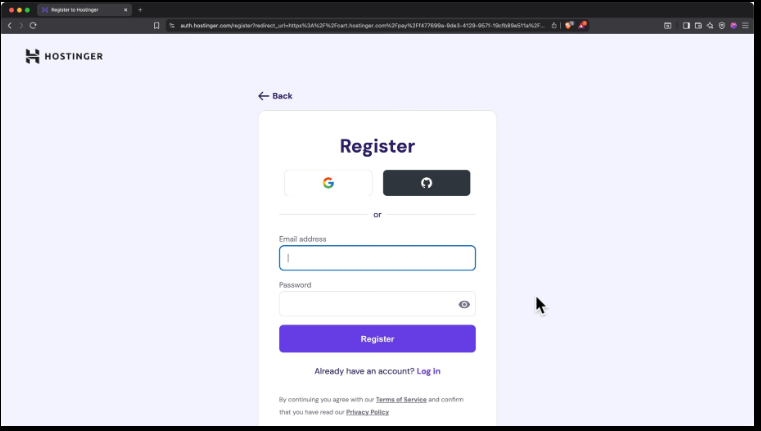
Figure 3. account-creation form.
Step 2: Review the billing term and order
Hosting companies often show several billing periods. A longer term can reduce the average introductory cost, but it also creates a larger upfront payment. Compare the full amount, the renewal terms, the refund policy, taxes, optional extras, and whether a domain is included. Remove add-ons you do not need rather than accepting every preselected option.
Do not judge only by the monthly equivalent. The amount charged today, renewal amount, billing period, and included services are the figures that matter.
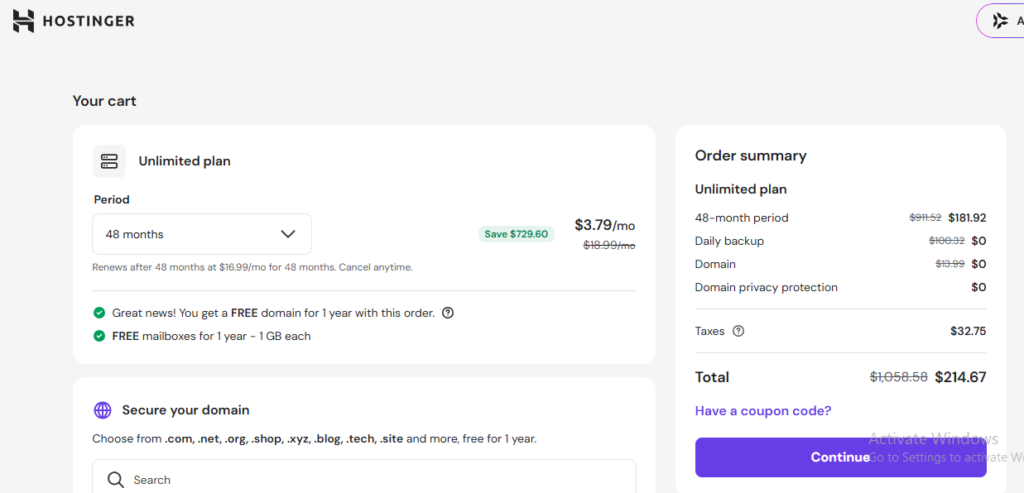
Figure 4. checkout review.
Step 3: Search for the domain
A domain should be easy to remember, spell, and say aloud. For this project, the example is howtoyoublog.com. Search for your preferred name and verify the exact spelling before registering it. If it is unavailable, try a close brand variation rather than adding confusing numbers or multiple hyphens.
Domain registration may require accurate contact information. Some registries or extensions have additional eligibility rules. Complete the ownership details carefully and enable privacy protection when it is included and appropriate for the extension.
5. Search the exact domain and extension.
6. Check for spelling errors.
7. Choose the registration period.
8. Complete registrant details accurately.
9. Confirm that the domain is connected to the intended hosting account.
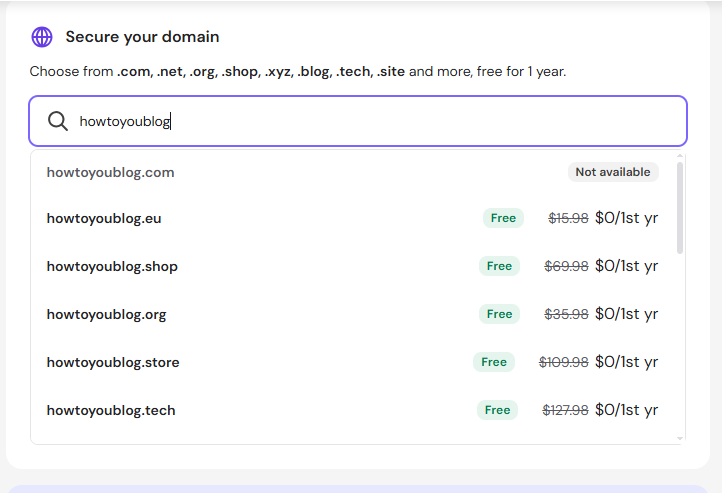
Figure 5. domain-search form using the example project.
Step 4: Finish onboarding
After payment, Hostinger may ask whether you want to create a new website, migrate an existing one, or skip for later. Choose the new-website path for this guide. You may also be asked to select WordPress or another builder. Select WordPress when you want the flexibility of themes, plugins, blog posts, and standard WordPress administration.
4. Understand hPanel Before Changing Settings
hPanel is Hostinger’s account and website management interface. It is separate from the WordPress dashboard. hPanel manages the hosting environment: domains, DNS, files, databases, email, SSL, backups, performance tools, and account-level settings. WordPress manages content and design inside the website.
| Area | Typical purpose |
| Websites | Open the management dashboard for a specific site. |
| Domains | Manage registrations, nameservers, redirects, and DNS records. |
| Files | Use File Manager, FTP details, and backup tools. |
| Databases | View database names, users, and phpMyAdmin access. |
| Create domain mailboxes when included. | |
| Security | Review SSL, malware-related tools, and access controls. |
| Performance | Use caching, CDN, or optimisation features available to the plan. |
Do not change DNS records, delete files, or edit databases simply to explore. Begin with the website dashboard and use the search field when you cannot find a feature. Menu names may differ slightly as the interface evolves.
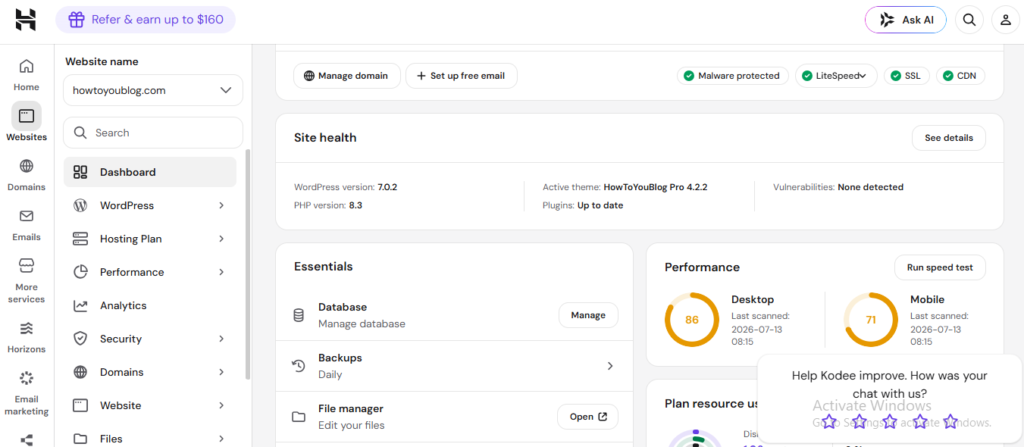
Figure 6. hPanel dashboard.
5. Install WordPress
Start the WordPress setup
From the website onboarding flow or the website dashboard, choose the WordPress installation option. The installer normally asks for an administrator email, username, password, website title, and language. These values matter because the administrator account controls the entire site.
10. Select WordPress as the website platform.
11. Enter the administrator email address.
12. Create a username that is not easy to guess.
13. Generate a long, unique password.
14. Enter a working site title such as How To You Blog.
15. Choose the site language and continue.
Protect the administrator account. Do not use the site name as the password, reuse an email password, or publish the administrator username in a tutorial screenshot.
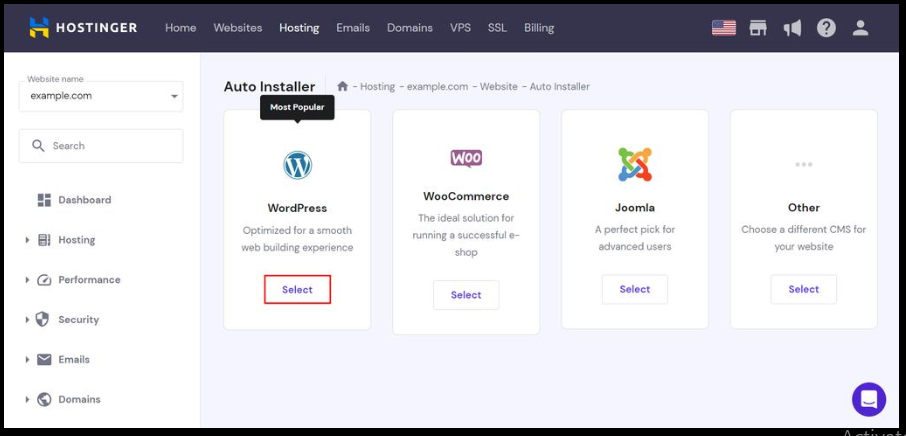
Figure 7. WordPress installer.
Wait for provisioning and open WordPress
The installer creates the database, website files, and connection settings. When it finishes, open the WordPress dashboard from hPanel or visit your domain followed by /wp-admin. For example: https://howtoyoublog.com/wp-admin. If the domain is newly registered, DNS or certificate setup may need time before every visitor sees the site correctly.
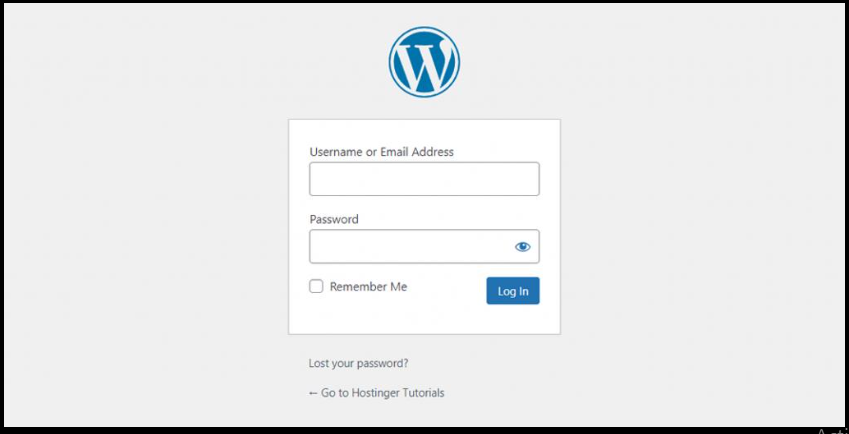
Figure 8. WordPress login Page.
Confirm the installation
· The homepage opens without a server error.
· The WordPress dashboard accepts the administrator credentials.
· The address uses the intended domain.
· HTTPS works or is being provisioned.
· The site title is correct enough to continue.
If the website opens on a temporary address, return to the domain or website settings and confirm which domain is assigned. Avoid publishing content until the final address is correct, because changing URLs later may create redirects and broken links.
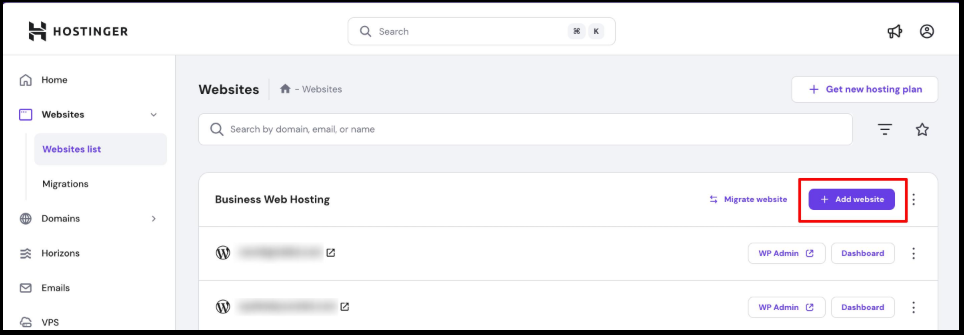
Figure 9. website-setup flow.
6. Configure the Essential WordPress Settings
The default installation works, but a few settings should be corrected before you design the site. Open the WordPress dashboard and review Settings. Make one change at a time and save it before moving to the next area.
General settings
Set the site title, tagline, administration email, language, time zone, date format, and time format. Choose the time zone where you manage the business or publish content. Scheduled posts and reports can be confusing when the website uses the wrong zone.
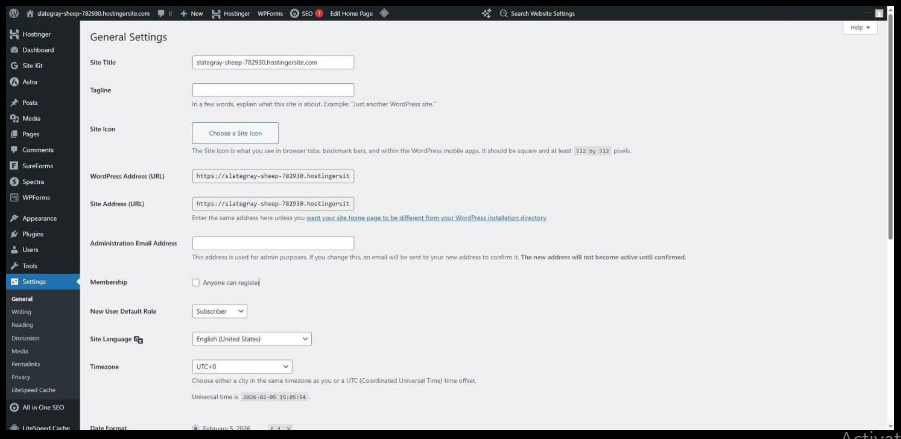
Figure 10. WordPress General Settings page.
Permalinks
Open Settings → Permalinks and select a readable structure. For most blogs, Post name is the clearest starting point because it creates URLs such as /how-to-start-a-blog/ instead of an ID-based address. Choose the structure before publishing many posts. Later changes require redirects to preserve existing links and search visibility.
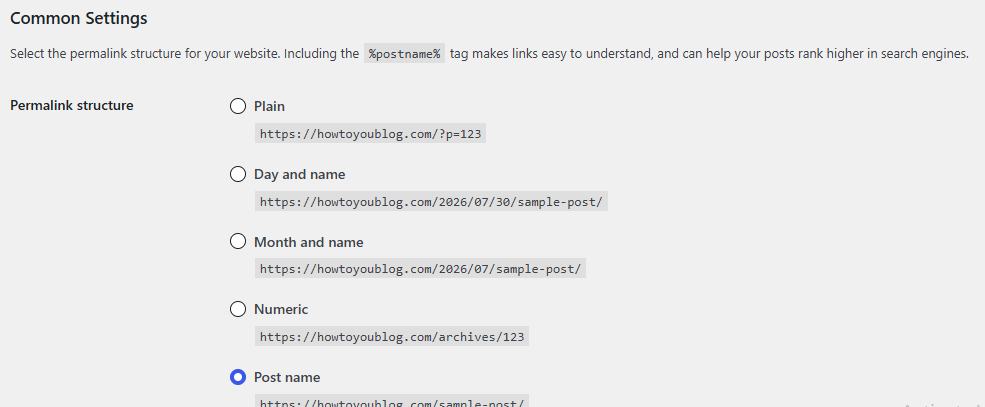
Figure 11. permalink recommendation.
Reading, discussion, and privacy
In Reading settings, choose whether the homepage displays the latest posts or a static page. A structured blog often uses a static homepage and a separate Blog page. In Discussion, decide how comments are moderated. Review the search-engine visibility option and make sure indexing is not discouraged when the public site is ready. During construction, you may temporarily discourage indexing, but remember to reverse it at launch.
Users and profiles
Update the administrator profile, display name, and recovery email. Add other users only when necessary, and give each person the lowest role that allows them to complete their task. An author does not normally need administrator access.
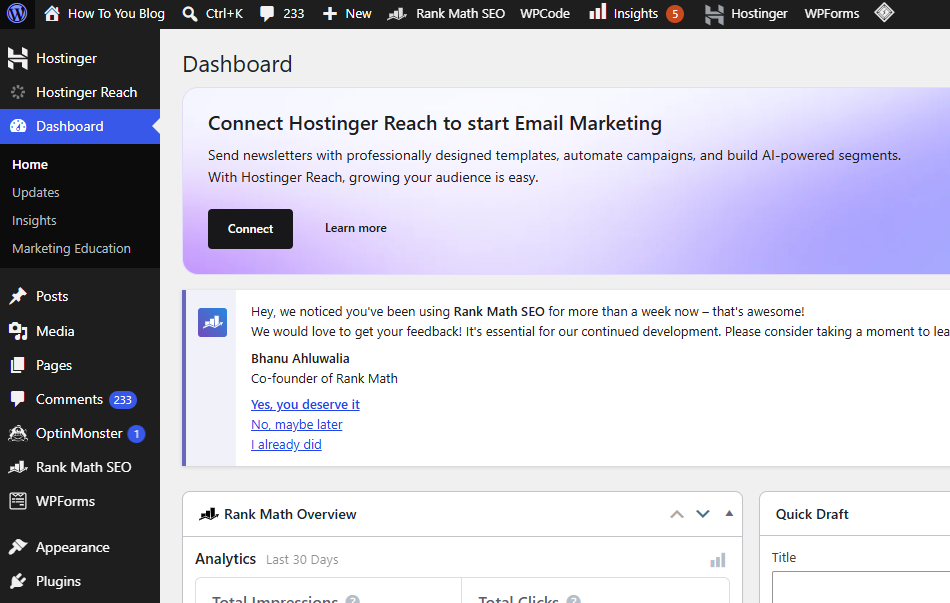
Figure 12. WordPress dashboard overview.
7. Choose a Theme and Install Only Essential Plugins
Choose a lightweight theme
A theme controls the visual foundation of WordPress. For a blogging site, prioritise readability, mobile responsiveness, accessibility, update history, compatibility, and loading speed. A theme with dozens of demos can look impressive but may add features you never use. Begin with a simple theme, then adjust fonts, spacing, header, colours, and layout.
16. Open Appearance → Themes.
17. Select Add New.
18. Search for a well-maintained lightweight theme.
19. Preview it on desktop and mobile.
20. Install and activate only after checking the layout.
21. Delete unused themes except one current default theme kept as a fallback.
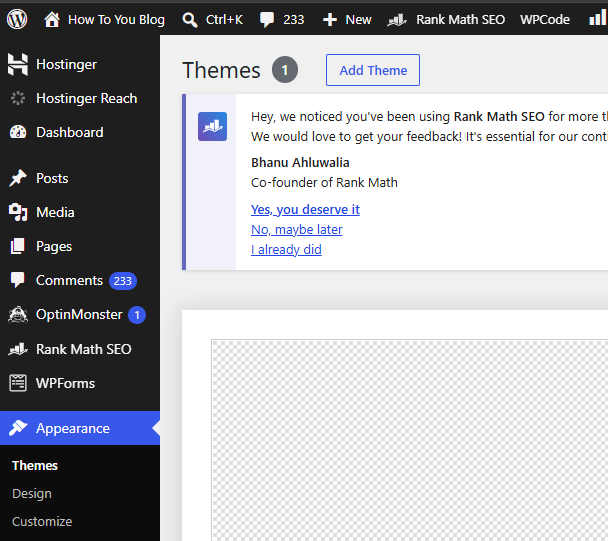
Figure 13. theme-selection gallery.
Install a small plugin set
Plugins extend WordPress. They can add SEO fields, caching, forms, image optimisation, backups, spam control, or security features. Every plugin also adds maintenance and potential compatibility risk. Use one plugin for each clear need and avoid installing several tools that perform the same job.
| Category | Purpose | Selection rule |
| SEO | Titles, descriptions, sitemap, schema assistance | Use one established SEO plugin. |
| Caching | Page cache and front-end optimisation | Prefer a solution compatible with the hosting stack. |
| Forms | Contact and enquiry forms | Choose a simple tool with spam protection. |
| Backups | Secondary or off-site copies | Do not duplicate the host backup without a reason. |
| Security | Login and monitoring features | Avoid heavy overlap with hosting security. |
| Images | Compression and modern formats | Test visual quality after optimisation. |
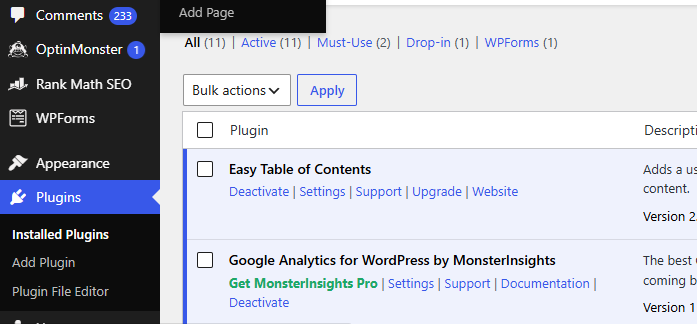
Figure 14. plugin-management screen.
Test after each activation. Activate one plugin, open the homepage and dashboard, and check for errors before adding another. This makes conflicts easier to identify.
8. Create the Essential Pages and Navigation
A new website does not need dozens of pages. It needs a clear path for visitors. Create the main pages first, publish useful text, and improve the design after the information structure is working.
Core pages
| Page | What it should accomplish |
| Home | Explain the topic, audience, value, and next step. |
| Blog | Display recent articles or category paths. |
| About | Explain who runs the site and why the content exists. |
| Contact | Provide a working form and realistic response expectations. |
| Privacy Policy | Describe data handling and third-party services. |
| Disclaimer | Clarify informational, affiliate, or professional limitations when relevant. |
| Terms | Set site-use terms where appropriate for the business. |
Use a clear page title, one primary heading, short paragraphs, and descriptive links. Avoid publishing empty pages that say “coming soon” unless they are hidden from navigation. Legal requirements vary by country and business model, so use appropriate professional advice for policies that affect compliance.
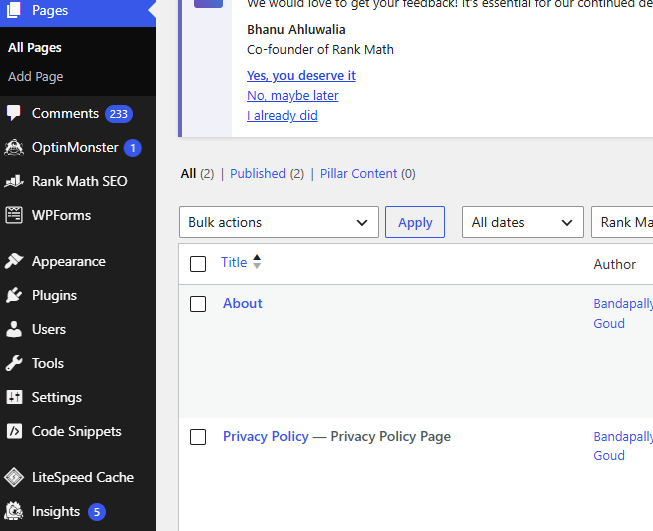
Figure 15. core-page workflow.
Create the main menu
Open the navigation or menu settings available in your theme. A beginner menu can contain Home, Blog, About, and Contact. Put legal links in the footer. Test the menu on a phone, confirm dropdowns are usable, and make sure the logo or site title returns visitors to the homepage.
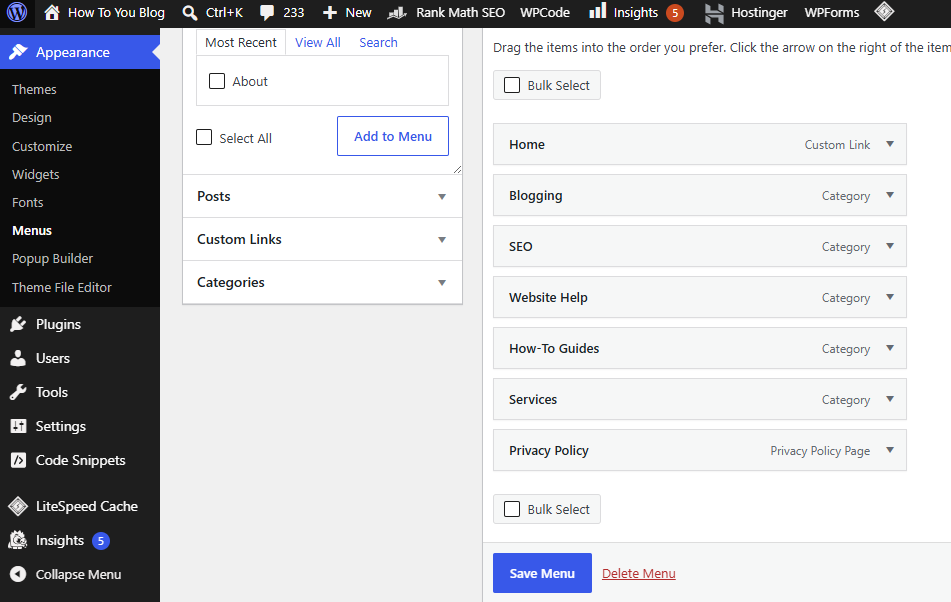
Figure 16. Conceptual navigation setup. Not an actual menu editor.
Prepare the first article
Before launch, publish at least one genuinely useful article that matches the site topic. Add a descriptive title, introduction, headings, examples, images with alternative text, internal links, and a conclusion. Preview the article on mobile and desktop before publishing.
9. Enable SSL, Secure the Site, and Confirm Backups
SSL and HTTPS
SSL encrypts traffic between the visitor and the website. Hostinger typically provides SSL management in the website dashboard, but the exact activation flow can differ. Confirm that the certificate is active, the WordPress Address and Site Address use HTTPS, and pages do not load insecure images or scripts.
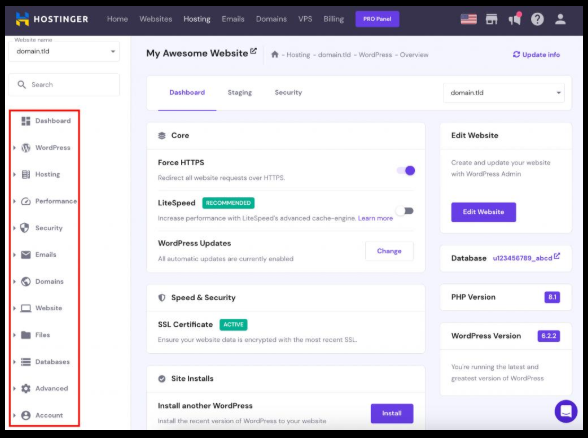
Figure 17. Conceptual SSL status panel. Not an actual certificate screen.
Basic security
· Use unique passwords and two-factor authentication where available.
· Keep WordPress core, themes, and plugins updated.
· Remove plugins, themes, and user accounts that are no longer required.
· Use administrator access only for administration.
· Review login and security notices instead of ignoring repeated alerts.
· Avoid downloading themes or plugins from untrusted sources.
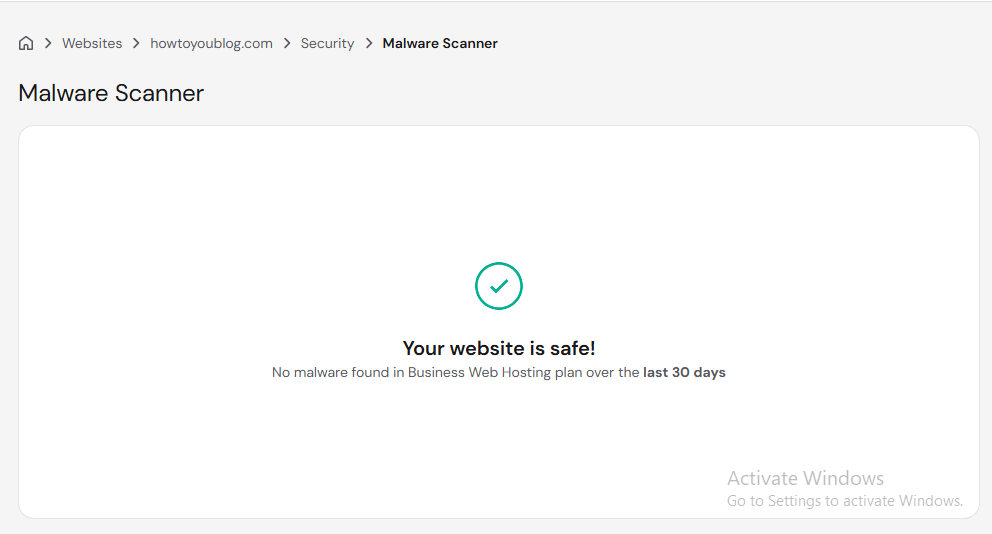
Figure 18. Conceptual security workflow. Not an actual security product screen.
Backups
A complete WordPress backup includes both website files and the database. Hostinger documents a built-in hPanel backup workflow under the website dashboard and Files → Backups; availability and frequency depend on the hosting plan. Confirm the current schedule in your account and learn how restoration works before an emergency. For important sites, keep an additional off-site copy or a tested secondary backup method.
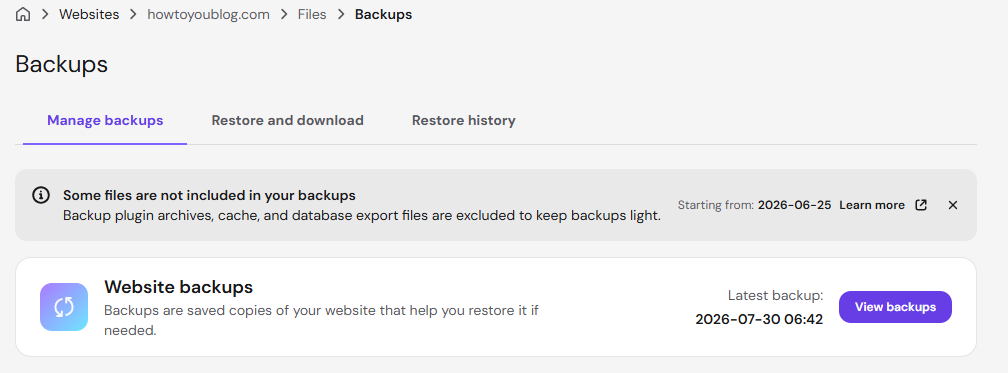
Figure 19. backup-management panel.
A backup is useful only when it can be restored. Periodically verify that recent copies include files and the database, and document the restoration steps.
10. Connect Search Console and Analytics, Then Improve Speed
Google Search Console
Search Console helps you verify ownership, submit a sitemap, inspect URLs, and monitor indexing or search-performance issues. Add the correct property type, complete verification, and submit the sitemap generated by your SEO plugin. Use URL Inspection after publishing important pages, but do not expect immediate rankings simply because a URL was submitted.
23. Complete the recommended ownership verification.
24. Open the Sitemaps report.
25. Enter the sitemap path produced by WordPress or the SEO plugin.
26. Inspect the homepage and a published article.
27. Review indexing reports over time.
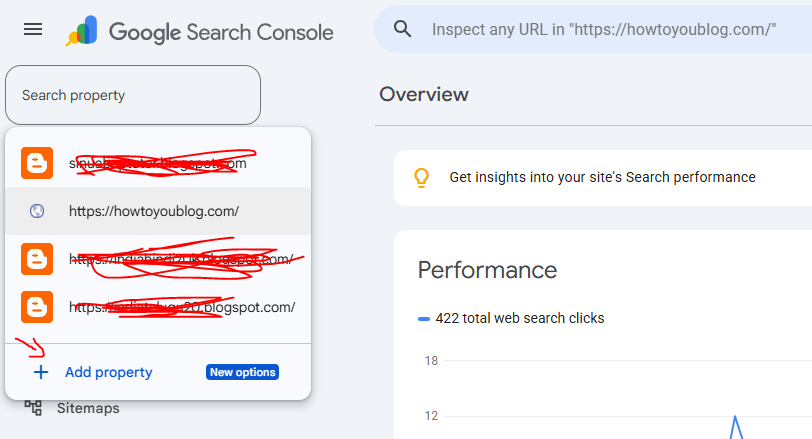
Figure 20. Search Console setup workflow.
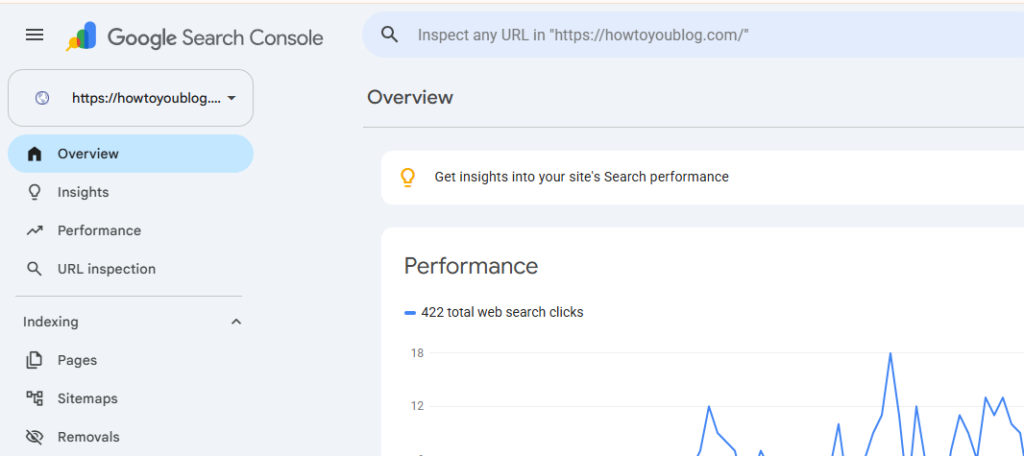
Figure 21. sitemap-submission.
Google Analytics 4
Create a GA4 property, add a Web data stream for the final HTTPS domain, and install the Google tag through a supported WordPress integration or a tag-management method. Google’s documentation notes that data collection can take time to begin; use the Realtime report while visiting the site to verify that the tag is working. Avoid installing the same tag through multiple plugins or theme fields because that can duplicate measurements.
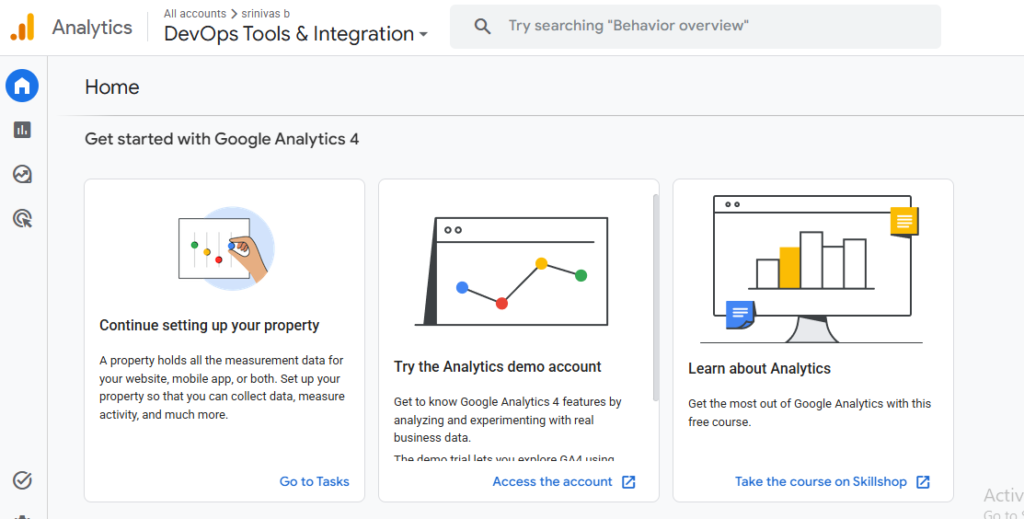
Figure 22. GA4 setup workflow.
Speed optimisation
Start with the largest practical improvements: compress images before upload, use sensible dimensions, choose a lightweight theme, remove unused plugins, enable compatible caching, and avoid loading unnecessary fonts, video backgrounds, or animation libraries. Test the homepage and an article on mobile and desktop. A fast empty page is not the objective; the goal is a useful page that remains responsive and stable.
| Area | Beginner action |
| Images | Resize to the displayed width and compress before upload. |
| Caching | Enable one compatible caching method and clear it after major changes. |
| Plugins | Remove inactive or overlapping tools. |
| Fonts | Use a small number of font families and weights. |
| Third-party scripts | Add only tools that support a clear business purpose. |
| Testing | Compare results before and after each major change. |
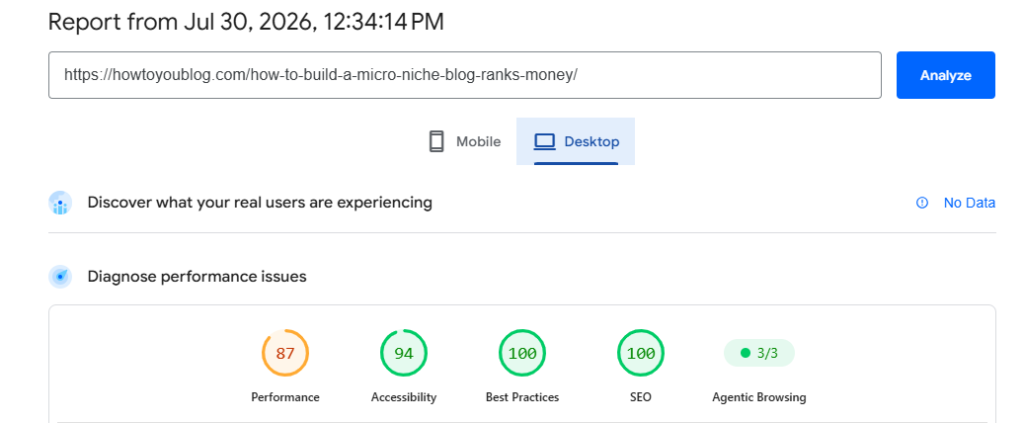
Figure 23. performance dashboard.
Mobile review
Open the site on a real phone as well as a browser preview. Check text size, button spacing, menu behaviour, image width, forms, sticky elements, cookie notices, and horizontal scrolling. Mobile problems often come from oversized images, fixed-width blocks, or plugins that add intrusive pop-ups.
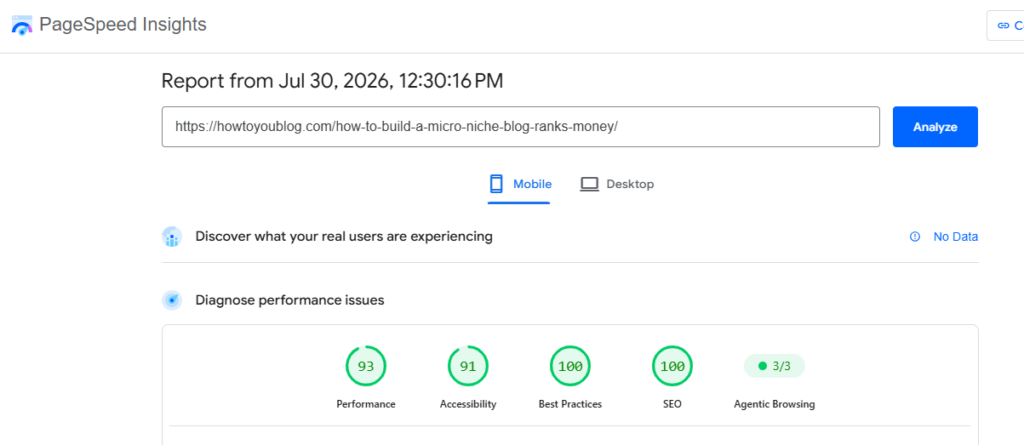
Figure 24. responsive preview.
11. Launch Checklist and Troubleshooting
Final launch checklist
| Check | Status |
| Domain opens the correct website | ☐ |
| HTTPS works across key pages | ☐ |
| Homepage and blog page are assigned correctly | ☐ |
| Menu and footer links work | ☐ |
| Contact form delivers a test message | ☐ |
| Privacy and disclaimer pages are published | ☐ |
| Search visibility is enabled | ☐ |
| Sitemap is submitted | ☐ |
| Analytics appears in Realtime | ☐ |
| Mobile layout is usable | ☐ |
| Backup schedule is confirmed | ☐ |
| Administrator account is protected | ☐ |
Common problems
| Problem | First checks |
| Domain does not open | Confirm assignment, DNS records, nameservers, and propagation. |
| HTTPS warning | Check certificate status, redirects, and mixed-content resources. |
| WordPress login fails | Use password recovery and confirm the correct /wp-admin address. |
| Blank page or server error | Undo the latest change, disable the suspected plugin, and review logs. |
| Slow pages | Test image size, caching, plugins, fonts, and third-party scripts. |
| Form messages missing | Check recipient settings, spam folders, and mail delivery configuration. |
| Google does not index a page | Check robots settings, noindex tags, sitemap status, and URL Inspection. |
| Analytics shows no visits | Verify the tag, correct property, consent behaviour, and Realtime test. |
When a problem begins after a change, start with that change. Record what you installed or edited, clear relevant caches, test in a private browser window, and restore from a known backup when the site cannot be recovered safely. Avoid applying several fixes at once because you will not know which one solved or created the issue.
12. Frequently Asked Questions
Can a beginner create a Hostinger website without coding?
Yes. WordPress, themes, and plugins cover the normal needs of a blog or small website. Coding becomes useful for custom behaviour, but it is not required for the basic setup in this guide.
Should I use WordPress or a website builder?
Choose WordPress when you want broad theme and plugin flexibility, portable content, and a familiar blogging workflow. A website builder may be simpler for a small brochure site. The better choice depends on long-term needs.
How long does setup take?
The technical installation can be quick, but a publication-ready site takes longer because you must write pages, create branding, test forms, review policies, optimise images, and check mobile behaviour.
Do I receive a free domain?
Some plans or promotions may include a domain for a limited period. Check the current checkout details, eligible extensions, and renewal conditions before relying on it.
Is SSL included?
Hostinger commonly provides SSL tools, but confirm the exact inclusion and activation status in the current plan and account dashboard.
Which WordPress theme should I choose?
Use a lightweight, responsive, maintained theme that supports the layout you need. The best theme is one you can keep updated and customise without installing many overlapping add-ons.
How many plugins are too many?
There is no universal number. Quality, overlap, code weight, and maintenance matter more than the count. Install only plugins with a clear purpose and remove those you do not use.
Do I need a security plugin?
It depends on the hosting protections and features you need. Strong credentials, updates, backups, and limited administrator access are essential. Add a security plugin only when it provides a specific benefit without duplicating other tools.
How do I get the site into Google?
Allow indexing, verify the site in Search Console, submit the sitemap, publish useful pages, and build clear internal links. Indexing and ranking are separate processes, and neither is guaranteed immediately.
Should I install Google Analytics before launch?
Install and verify it before or at launch so your early traffic is measured. Make sure your privacy and consent approach fits the laws and audience relevant to your site.
What should I back up?
Back up both WordPress files and the database. Files contain themes, plugins, and uploads; the database contains posts, settings, users, and many plugin records.
Can I change the domain later?
Yes, but it requires URL changes, redirects, Search Console updates, analytics review, and careful testing. Choose the final domain before publishing whenever possible.
Why is my website still slow after caching?
Caching cannot fix every issue. Oversized images, heavy themes, excessive scripts, external fonts, advertisements, and poorly designed plugins can still delay loading.
What pages should a new blog publish first?
Start with Home, Blog, About, Contact, Privacy Policy, and any necessary disclaimer or terms pages. Then publish useful articles that answer specific audience questions.
Can conceptual mockups be used in the article?
Yes, when they are clearly labelled as illustrations and are not presented as genuine account screenshots. Replace them with your own captures when the article claims to document a real setup.
13. Conclusion and Publishing Checklist
Building a website in Hostinger is easier when you treat it as a sequence of small decisions rather than one large technical task. Choose a plan that matches the project, register the correct domain, learn the difference between hPanel and WordPress, protect the administrator account, configure the basic settings, install a lightweight theme, add only necessary plugins, create the essential pages, enable HTTPS, confirm backups, connect measurement tools, test speed, and review the site on mobile.
The first version does not need every feature. It needs to work, communicate a clear purpose, protect visitor and account data, and make it easy to publish useful content. After launch, review updates, backups, Search Console, analytics, broken links, forms, and performance on a regular schedule. Improve the site using real visitor needs and measured problems rather than adding tools simply because other websites use them.
Before publishing this guide on howtoyoublog.com, replace any example that does not match your actual plan or interface. Keep every conceptual image labelled, or substitute genuine screenshots captured from your own account with private information removed. This final review turns a general tutorial into a trustworthy documented project.
Editorial publishing checklist
· Confirm the current Hostinger plan names and features.
· Replace or retain each conceptual illustration with its disclosure caption.
· Remove account numbers, emails, invoices, and personal details from genuine screenshots.
· Add internal links to relevant articles on howtoyoublog.com.
· Add image ALT text that describes the instructional purpose.
· Check the final title, slug, meta description, and canonical URL.
· Proofread on desktop and mobile before publication.
References and Verification Notes
The guide was prepared using current official documentation available in July 2026. Product interfaces and plan details can change, so the current account dashboard remains the source of truth for the user’s exact setup.
· Hostinger Tutorials: How to back up a WordPress site using hPanel, a plugin, and the manual method (updated 2026).
· Google Analytics Help: Set up Analytics for a CMS-hosted website and verify data in Realtime.
· Google Analytics Help: Create a GA4 property, add a Web data stream, and install the Google tag.
· Google Search Console Help: Add and verify a property, submit a sitemap, and inspect URLs.
Appendix: A Practical 30-Day Post-Launch Plan
A website is not finished on launch day. The first month is the best time to discover technical mistakes, improve weak pages, and establish a maintenance routine. Use this simple plan to make progress without changing too many things at once.
Days 1–3: Verify the essentials
Open the homepage, blog, About page, Contact page, privacy page, and one article on a phone and computer. Submit a real contact-form test, check the delivery mailbox, and click every menu and footer link. Confirm that HTTPS remains active and that the website does not redirect to a temporary domain. Visit the site while viewing Google Analytics Realtime, then inspect the homepage in Search Console. Record problems in one list instead of trying random fixes.
Days 4–7: Improve the first content path
Ask a new visitor to explain what the website offers after viewing the homepage for ten seconds. If the answer is unclear, simplify the opening heading and supporting text. Add a visible route to the best beginner article. Review page titles, image alternative text, internal links, and calls to action. Keep promotional elements secondary to the information a visitor came to find.
Week 2: Publish and connect useful content
Publish one or two focused articles that answer specific questions. Link from each new article to a relevant main guide and link back from the main guide where the connection helps the reader. Avoid adding unrelated links only for SEO. Update the blog page or category structure so visitors can discover the new material without using search.
Week 3: Review performance and usability
Test the homepage and a representative article again after content and plugins have been added. Compare mobile and desktop behaviour. Optimise any unusually large images, remove unused widgets, and check whether pop-ups or consent tools cover important content. Do not chase a perfect score at the cost of readability or required functionality.
Week 4: Establish maintenance
Review available updates, generate or confirm a fresh backup, and check Search Console for indexing or page-experience warnings. Review Analytics for obvious tracking gaps rather than making major content decisions from a small amount of data. Create a recurring monthly checklist for backups, updates, forms, broken links, top pages, and older content that needs correction.
Internal Linking Suggestions for howtoyoublog.com
This Hostinger tutorial can support a broader blogging content cluster. Add internal links only when the destination page genuinely helps the reader complete the next task. Suitable related topics include how to choose a domain name, how to start a blog, WordPress settings for beginners, essential WordPress plugins, how to create an About page, how to connect Search Console, basic on-page SEO, image optimisation, and a website maintenance checklist. Use descriptive anchor text instead of repeated phrases such as “click here.”
After publishing related articles, return to this guide and add links in the relevant steps. For example, link the domain section to a detailed domain-name guide, the plugin section to a plugin comparison, and the Search Console section to a dedicated verification tutorial. This creates a useful learning path and helps search engines understand how the pages relate to one another.



Leave a Reply