I still remember the days when people used to talk about getting a passport like it was some huge headache. Long queues, piles of papers, running from one office to another… honestly, it sounded exhausting.
Things are a lot different now.
If you’re wondering how to apply for passport online, the good news is that most of the work can be done from your home. You can fill out the application form, upload details, pay the fee, and even book your appointment online. A laptop, phone, and a decent internet connection are usually enough to get started.
That said, the process isn’t completely online yet. After you complete the online passport application, you’ll still need to visit a Passport Seva Kendra (PSK), Regional Passport Office (RPO), or Post Office Passport Seva Kendra (POPSK). That’s where officials verify your documents, take your photograph, collect fingerprints, and complete the biometric process.
The first time I looked into the passport apply online India process, I expected it to be confusing. Surprisingly, it was much simpler than I thought. The official portal guides you through each step, and if your documents are ready, the whole process feels far less stressful than it used to be.
In this guide, I’ll walk you through every step so you know exactly what to do, what documents you’ll need, and how to avoid the small mistakes that often slow people down.
2. Quick Answer: How to Apply for Passport Online
If you’re wondering how to apply for a passport online, don’t worry. The process is much simpler than many people think. The first time I looked at the passport application process, I expected a mountain of paperwork and endless office visits. Honestly, it wasn’t nearly as complicated as I imagined.
The whole online passport application process starts on the Passport Seva website. First, create an account and register using your email address. Once that’s done, log in and choose whether you’re applying for a fresh passport or requesting a reissue of an existing one.
Next, fill out the application form carefully. Take your time here. A small spelling mistake in your name or address can create unnecessary headaches later. After submitting the form, pay the passport fee online and select a convenient appointment slot.
On the appointment day, visit your chosen Passport Seva Kendra (PSK), Regional Passport Office (RPO), or Post Office Passport Seva Kendra (POPSK). Carry your original documents and appointment receipt. The officials will verify your documents, collect your photograph and fingerprints, and complete the required checks.
After that, the remaining steps happen behind the scenes. Depending on your case, police verification may be conducted. You can track your application status online using your file number. Once everything is approved, your passport is printed and delivered to your address.
That’s really it. Follow the steps one by one, keep your documents ready, and the process becomes much less stressful than it sounds.
3. Who Can Apply for a Passport Online?
A lot of people think passports are only for those planning an international trip right away. That’s not really true. In fact, almost anyone who meets the basic requirements can apply for a passport online in India.
If you’ve never had a passport before, you’ll need to apply for a fresh passport online. This is the option most students, job seekers, and first-time travelers choose. I always tell people that even if you don’t have travel plans today, having a passport is useful. Many companies and government services accept it as a strong proof of identity and address.
Already have a passport that’s about to expire or has expired? Then you’ll need a reissue passport online application. Reissue is also used when your passport pages are full or when certain personal details need updating.
Parents can apply for a passport for minor online as well. Whether your child is a few months old or a teenager, the online process is available. The documents are slightly different, but the application starts in the same way.
Adults of any age can apply. There isn’t a “perfect age” to get a passport. Some people apply at 18, while others finally get one in their 40s or 50s when planning their first overseas trip.
You can also apply for a reissue if your passport is damaged, lost, or stolen. It feels stressful when that happens—I can only imagine the panic—but the Passport Seva system has procedures to help you get a replacement.
And if you’ve changed your name after marriage, corrected a spelling mistake, or moved to a new address, you can update those details through the reissue process too.
So, whether you’re a first-time applicant, a parent applying for your child, someone renewing an old passport, or updating personal information, the online passport application process is designed for all of these situations.
4. Documents Required for Passport Online Application
I’ll be honest. Most people don’t get stuck while filling out the passport form. They get stuck when they reach the document section.
You open the website, start the application, and then suddenly wonder, “Do I have the right proof? Is my Aadhaar enough? What if I’m staying in a rented house?”
I’ve seen many people delay their passport application just because they weren’t sure which documents to upload or carry to the Passport Seva Kendra.
The good news? You usually don’t need a huge pile of paperwork. In most cases, a few valid documents are enough.
Common Documents Required for Passport Application Online
| Document Type | Accepted Documents |
|---|---|
| Address Proof | Aadhaar Card, Voter ID, Electricity Bill, Water Bill, Bank Passbook, Gas Connection Bill, Rent Agreement (in some cases) |
| Date of Birth Proof | Birth Certificate, PAN Card, Aadhaar Card, School Leaving Certificate, SSC Certificate |
| Identity Proof | Aadhaar Card, PAN Card, Voter ID, Driving License |
| For Passport Reissue | Old Passport |
| For Minors | Parents’ Passports, Birth Certificate, Aadhaar Card (if available) |
| Tatkaal/Special Cases | Additional supporting documents as specified by Passport Seva |
Which Documents Work Best for Different Applicants?
This is where many articles stop. They give a list and leave you guessing.
If you’re a student, your Aadhaar Card and school or college records are usually the easiest documents to use. Keep your birth certificate or SSC certificate ready as well.
If you’re working in a company, Aadhaar, PAN Card, and a bank passbook are often enough for most applications. Just make sure your name and address match across documents. Small spelling differences can create unnecessary headaches later.
For homemakers, Aadhaar Card is usually the most convenient option because it works for both identity and address verification in many situations.
Renters often worry the most. I know a friend who thought he couldn’t apply because he had recently moved to another city. In reality, if your Aadhaar has been updated with your current address, the process becomes much smoother. Some applicants may also use supporting documents such as bank statements or rental-related records if needed.
Documents for Minors
When applying for a child’s passport, parents play a big role in the process.
You’ll generally need the child’s birth certificate and the parents’ passport details if available. If the parents don’t have passports, don’t panic. The application can still move forward with other acceptable documents.
A Quick Tip Before You Submit
Take ten minutes and check every document carefully.
Make sure your name, date of birth, and address are consistent everywhere. Something as small as a missing letter in your surname can lead to delays, extra visits, and a lot of frustration.
Trust me, spending a few extra minutes checking your documents now is much easier than fixing mistakes later.
5. Step-by-Step Process to Apply for Passport Online
If you’ve never applied for a passport before, the whole process might seem a little confusing at first. I remember helping a relative apply for their first passport, and honestly, they thought they would need to visit multiple government offices and stand in long lines all day. Thankfully, things have become much easier.
Most of the passport application process now happens online. You can fill out the form, pay the fee, and book an appointment from your home. The only time you need to visit a passport office is for document verification and biometric checks.
Here’s exactly how to apply for a passport online in India, step by step.
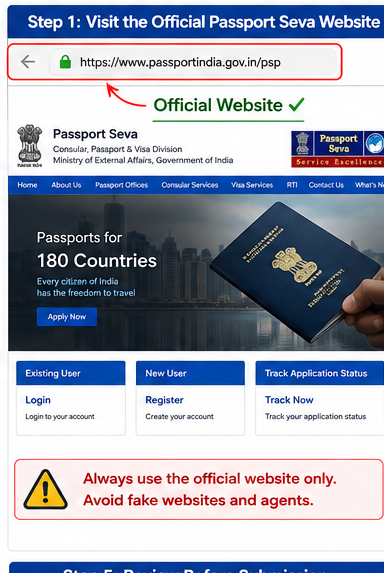
Step 1: Visit the Official Passport Seva Website
The first thing you need to do is visit the official Passport Seva website.
Be careful here.
Many people search “passport apply online” on Google and accidentally click on websites that look official but are actually private agent websites. Some of them charge extra fees for services you can do yourself in a few minutes.
Always check that you’re using the official Passport Seva portal before entering your personal information.
Once you’re on the website, you’ll find options for new passport applications, passport renewal, appointment booking, and application tracking.
Take a minute to look around the site. It will make the next steps easier.
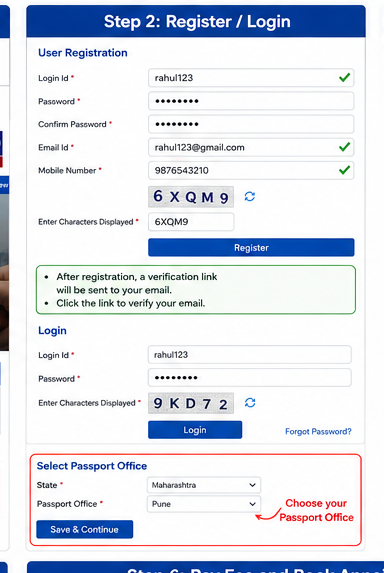
Step 2: Register or Login
If you’re applying for the first time, you’ll need to create an account.
Click on the “Register Now” option and fill in basic details such as:
- Your name
- Date of birth
- Email address
- Login ID
- Password
Choose a login ID that you’ll remember. Trust me, forgetting it later can be annoying when you need to check your application status.
After registration, the system will send a verification email. Open your inbox and click the verification link to activate your account.
Once your account is active, log in using your Login ID and password.
During registration, you’ll also select the Passport Office nearest to your location. Choose the one that serves your current residential address.
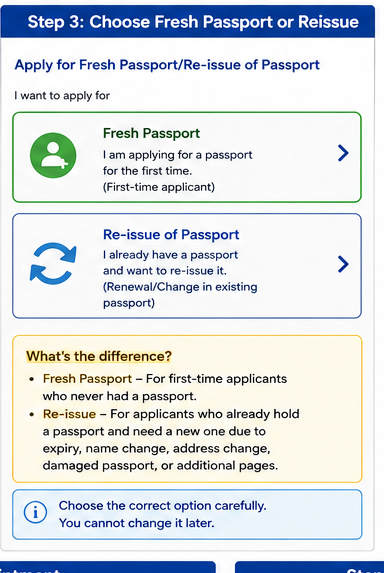
Step 3: Choose Fresh Passport or Reissue
After logging in, you’ll see different passport services.
This is where many people get confused.
A Fresh Passport is for someone applying for a passport for the very first time.
A Reissue Passport is for people who already have a passport but need a new one because:
- The passport has expired
- Pages are full
- Address has changed
- Name has changed
- Passport is damaged or lost
Simply select the option that matches your situation and continue.
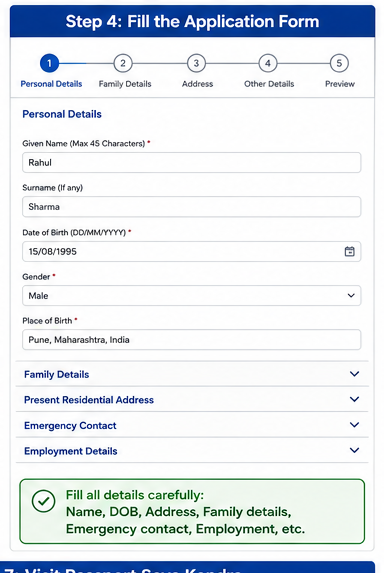
Step 4: Fill the Application Form
Now comes the main part of the process.
The application form asks for several personal details, so keep your documents nearby while filling it out.
You’ll typically enter:
- Full name
- Date of birth
- Gender
- Place of birth
- Residential address
- Parent details
- Marital status
- Emergency contact information
- Employment details
- Educational qualification
My advice? Don’t rush.
Even a small spelling mistake can create unnecessary headaches later. For example, if your Aadhaar card shows “Kumar” and your application says “Kumaar,” you may face verification issues.
Double-check every field before moving to the next page.
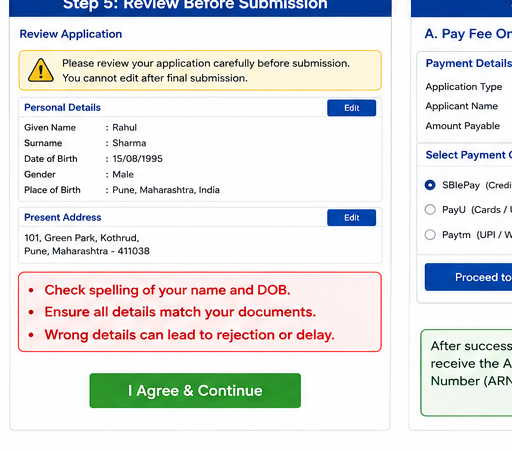
Step 5: Review Everything Before Submission
This step may look boring, but it can save you a lot of trouble.
Before submitting the application, review all the information carefully.
Pay special attention to:
- Name spelling
- Date of birth
- Address
- Parent names
- Mobile number
- Email address
Make sure the information matches your supporting documents exactly.
A surprising number of applications get delayed because of simple typing mistakes.
Spend five extra minutes checking everything now instead of spending weeks correcting errors later.
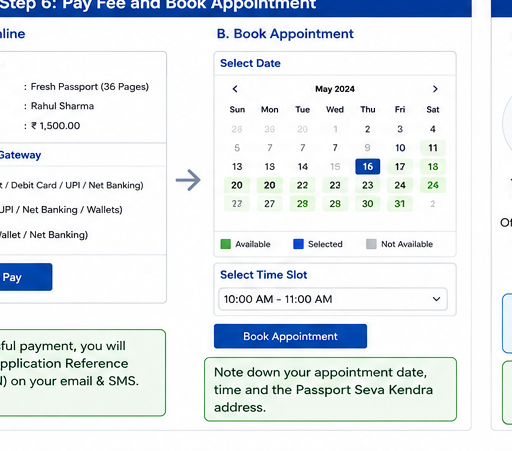
Step 6: Pay the Fee and Book an Appointment
Once your application is submitted successfully, you’ll need to pay the passport fee online.
The portal usually offers different payment methods such as:
- Debit card
- Credit card
- Internet banking
- UPI
After payment, you can book an appointment at your preferred Passport Seva Kendra (PSK), Post Office Passport Seva Kendra (POPSK), or Regional Passport Office.
Appointment slots sometimes fill up quickly, especially in larger cities.
If you don’t find a suitable date immediately, don’t panic. New slots are often released regularly.
Choose a convenient date and time, then download or print the appointment receipt. You’ll need it during your visit.
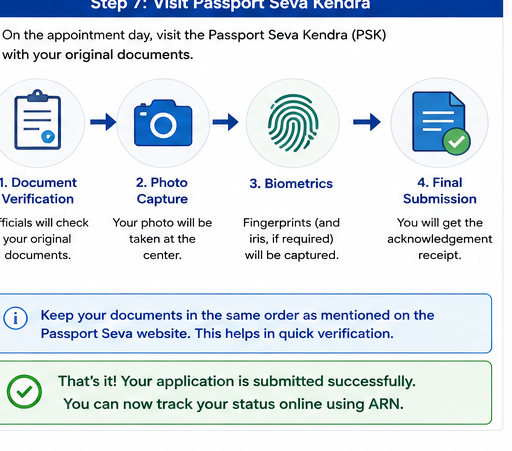
Step 7: Visit the Passport Seva Kendra
This is the only part where you need to appear in person.
On appointment day, carry:
- Original documents
- Photocopies of required documents
- Appointment receipt
Try to reach a little early. It makes the experience less stressful.
Inside the Passport Seva Kendra, officials will guide you through different counters.
The process usually includes:
Document Verification: Officers check your documents and application details.
Photograph Capture: Your passport photo is taken at the center.
Fingerprint Collection: Your biometric information is recorded.
Final Verification: A passport officer reviews everything and approves the application if all details are correct.
After completion, you’ll receive an acknowledgment receipt containing your file number or ARN.
Keep this receipt safe. You’ll use it later to track your passport application status online.
And that’s it. Once your application is processed, police verification may be conducted depending on your case. After successful verification, your passport is printed and delivered to your registered address.
The first time I saw someone complete the entire online passport application process, it felt much simpler than expected. If your documents are ready and your details are accurate, the whole process is usually smooth and straightforward.
6. Passport Fees in India
One of the first questions people ask before applying is, “How much does a passport cost?” I remember helping a cousin apply for his first passport, and honestly, the fee part confused him more than filling out the form. The good news? Once you know which type of passport you need, it’s pretty simple.
For most adults applying under the normal process, the passport fees in India depend on the number of pages you choose. A standard 36-page passport costs less and works perfectly for most people. If you travel frequently for work or business, you may prefer a 60-page passport because it gives you more visa and immigration stamp space.
Normal Passport Fees
| Passport Type | Fee |
|---|---|
| Fresh Passport (36 Pages) | ₹1,500 |
| Fresh Passport (60 Pages) | ₹2,000 |
Most first-time applicants go with the 36-page passport. Unless you’re planning to fly across countries every few months, you probably won’t fill those pages anytime soon.
Tatkaal Passport Fees
Need a passport urgently? That’s where the Tatkaal scheme comes in.
| Passport Type | Fee |
|---|---|
| Tatkaal Passport (36 Pages) | ₹3,500 |
| Tatkaal Passport (60 Pages) | ₹4,000 |
The Tatkaal passport fee is higher because your application gets processed faster. People often choose this option when they have sudden job opportunities, study abroad admissions, or emergency travel plans.
Passport Fees for Minors
Children below 18 years can also apply for a passport online. The fee is lower than an adult passport in many cases.
| Passport Type | Fee |
|---|---|
| Minor Passport (36 Pages, 5-Year Validity or Until Age 18) | ₹1,000 |
Parents should double-check the latest rules because passport validity for minors can vary depending on age and application type.
One small piece of advice: before paying any passport online application fees, visit the official Passport Seva website and verify the latest charges. Government fees can change over time, and you don’t want surprises halfway through your application. A quick check takes less than a minute and can save you a lot of confusion later.
Note: Passport fees and rules may change. Always verify the latest fee structure on the official Passport Seva Portal before making any payment.
7. How to Book Passport Appointment Online
After you submit your passport application and pay the fee, the next step is booking your passport appointment online. Honestly, this part sounds complicated when you hear about it for the first time, but it’s actually pretty simple once you’re inside the Passport Seva portal.
When booking your appointment, you’ll need to choose where you want to visit. You may see options like Passport Seva Kendra (PSK), Post Office Passport Seva Kendra (POPSK), or Regional Passport Office (RPO). Most people simply select the location closest to their home. I always recommend checking the travel distance before choosing because nobody enjoys spending half a day traveling for a 15-minute appointment.
One thing that surprises many applicants is appointment availability. Sometimes you can get a slot for the next day. Other times, especially in busy cities, you may need to wait a few weeks. If you don’t find a suitable date, don’t panic. New slots often open up, and checking again later can help.
Life happens, and plans change. Maybe you booked an appointment and suddenly realized you have an exam, office meeting, or family function on the same day. That’s okay. The Passport Seva portal allows you to reschedule your passport appointment. You can also cancel it if necessary and choose another date later, subject to the portal’s rules.
Now, here’s a small tip that can save you stress on appointment day. Carry your appointment receipt, original documents, and photocopies of all required documents. Don’t assume everything will be available digitally. I’ve heard stories of people reaching the center only to realize they forgot an important document at home. Trust me, that’s not a fun situation.
Try to arrive a little early. It gives you time to relax, find the correct counter, and avoid unnecessary rushing. A calm start makes the whole passport process feel much easier.
Read More: How to link Aadhar with PAN online?
8. What Happens at Passport Seva Kendra?
For many people, the Passport Seva Kendra (PSK) visit is the part that feels a little scary. I remember hearing stories from friends who thought they would spend the whole day standing in long lines. The reality is usually much smoother if you’ve already booked your appointment and carried the right documents.
When you reach the Passport Seva Kendra, the first thing you’ll receive is a token number. Think of it like taking a token at a bank or hospital. This number helps staff call applicants in an organized way, so you don’t have to guess where to go next.
The next stop is usually the document check counter. An officer will look at your original documents and compare them with the details in your passport application. This is why it’s a good idea to double-check everything before your appointment. Even a small spelling mistake can create unnecessary delays.
After that comes data verification. Here, another officer reviews the information you’ve submitted online. They may ask a few simple questions about your address, family details, or occupation. Don’t worry too much. They’re mainly confirming that the information is accurate.
Then comes the biometrics process. This part is quick. Your photograph is taken, your fingerprints are scanned, and your digital signature is collected. Most people finish this step within a few minutes.
Next, you’ll meet the granting officer. This is one of the final stages in the Passport Seva Kendra process. The officer checks all records, verifies that your documents are complete, and decides whether your application can move forward for passport issuance.
Before leaving, you’ll receive a final receipt containing your ARN (Application Reference Number). Keep this receipt safe. You’ll need the ARN to track your passport application status online later.
Honestly, the PSK appointment process is much less stressful than many first-time applicants imagine. If your documents are correct and your application details match, you’ll mostly move from one counter to the next and be done before you know it. The hardest part is often just waiting for your turn. Once that’s over, you’re one step closer to holding your passport in your hands.
Read More: How to Check EPF balance?
9. Police Verification for Passport
A lot of people get nervous when they hear the words passport police verification. I was the same the first time I applied. My mind immediately jumped to all kinds of questions. What will they ask? Will they come to my house? What documents do I need?
The good news is that the process is usually simple if your information is correct.
What Is Passport Police Verification?
Police verification is a background check done to confirm that you really live at the address mentioned in your passport application and that the details you submitted are genuine. It helps the authorities verify your identity before or after issuing the passport.
Pre-Police Verification
In many fresh passport applications, police verification happens before the passport is issued. This is called pre-police verification.
A police officer may visit your home or ask you to visit the local police station. They will check your documents and confirm your address. Once the verification report is submitted and approved, your passport moves to the next stage.
Post-Police Verification
Sometimes, especially in certain passport categories, the passport may be issued first and police verification happens later. This is known as post-police verification.
Don’t worry if you receive your passport before the police visit. It doesn’t mean anything is wrong. The verification process is simply completed after passport issuance.
Cases Where Police Verification May Not Be Required
There are situations where police verification may not be needed or may be processed differently. For example, some government employees, diplomatic passport holders, or applicants renewing passports without major changes may receive relaxed verification requirements.
The exact rules can change, so it’s always smart to check the latest guidelines while applying.
Documents to Keep Ready
When the police officer visits, keep your documents organized. It saves a lot of stress.
Usually, you may need:
- Aadhaar Card
- Voter ID
- PAN Card
- Electricity or water bill
- Rental agreement (if applicable)
- Passport application receipt
- Old passport for reissue applications
I always suggest keeping both originals and photocopies nearby. It makes the whole interaction smoother.
Common Reasons for Delay
Most passport police verification delays happen because of small mistakes rather than major problems.
Some common reasons include:
- Incorrect address in the application
- Name mismatch across documents
- Applicant not available during verification
- Missing supporting documents
- Incomplete application details
- Wrong mobile number or contact information
One tiny spelling mistake can sometimes create unnecessary back-and-forth. That’s why it’s worth spending a few extra minutes checking every detail before submitting your application.
For most applicants, passport police verification is simply a routine step. Keep your documents ready, provide accurate information, and cooperate with the officer. In many cases, the process is completed without any trouble, and your passport application moves forward smoothly.
10. How to Track Passport Application Status
After submitting your passport application, the waiting part begins. And honestly, this is when most people start checking their status every few hours. I know someone who refreshed the Passport Seva website so many times that he practically memorized his application number.
The good news is that tracking your passport application status is pretty easy.
The simplest way is through your ARN (Application Reference Number) or file number. Once you’ve submitted your application and completed your Passport Seva Kendra appointment, you’ll receive a file number. Keep it safe. You’ll need it to track passport application status online.
Visit the Passport Seva portal, click on the “Track Application Status” option, select your application type, and enter your file number along with your date of birth. Within seconds, you’ll see the latest update on your application.
You may also receive SMS and email updates during different stages of processing. For example, you might get notifications when your police verification is initiated, completed, or when your passport is approved. These updates save you from checking the website every day.
Once your passport is printed and dispatched, another tracking option becomes available. The passport is usually delivered through India Post. At this stage, you’ll often receive a tracking number that lets you check your passport dispatch status on the India Post website.
If the tracking page shows “Passport has been dispatched,” you’re almost there. That’s usually the most exciting update because it means your passport is already on its way to your doorstep.
One small tip: don’t panic if the status doesn’t change for a few days. Sometimes the system updates take time. A little patience goes a long way during the passport process.
11. Fresh Passport vs Reissue Passport
A lot of people get confused when they see the options Fresh Passport and Reissue Passport on the Passport Seva website. Honestly, I was confused too the first time I looked at the application form. The names sound simple, but choosing the wrong one can slow down your application.
The easiest way to remember it is this:
A Fresh Passport is for someone who has never had a passport before. If you’re applying for your very first passport, this is the option you need.
A Reissue Passport is for people who already have a passport but need a new one because it has expired, got damaged, ran out of pages, or some personal details have changed.
Many people search for “passport renewal vs reissue” and assume they’re different things. In India, passport renewal is usually done through the reissue passport option. So if your passport is expiring or has already expired, you’ll generally choose reissue.
Fresh Passport vs Reissue Passport Comparison
| Situation | Fresh Passport | Reissue Passport |
|---|---|---|
| Applying for a passport for the first time | ✔ Yes | ✘ No |
| Passport has expired | ✘ No | ✔ Yes |
| Change of name after marriage or other reasons | ✘ No | ✔ Yes |
| Change of address | ✘ No | ✔ Yes |
| Passport damaged or lost | ✘ No | ✔ Yes |
| Passport pages are exhausted | ✘ No | ✔ Yes |
One small tip: before starting your online application, take a minute to check your current passport status. I’ve seen people accidentally choose “Fresh Passport” even though they already had an expired passport. That usually creates unnecessary delays and extra work.
When in doubt, ask yourself one question: “Have I ever had a passport before?” If the answer is no, choose Fresh Passport. If the answer is yes, you’ll most likely need Reissue Passport.
This section naturally targets the keywords fresh passport vs reissue passport, fresh passport meaning, reissue passport meaning, and passport renewal vs reissue without sounding forced or repetitive.
12. Normal Passport vs Tatkaal Passport
A lot of people get confused when they see two options while applying for a passport—Normal and Tatkaal. I remember helping a friend apply for his first passport, and his first question was, “Should I choose Tatkaal so I get it faster?” Sounds logical, right? But the answer isn’t always yes.
A Normal Passport is the standard application process. It’s usually the best choice if you’re not in a hurry. The fees are lower, and most applicants choose this option. After your appointment and document verification, the passport is processed according to the normal timeline. If you don’t have any urgent travel plans, this route can save you some money.
A Tatkaal Passport, on the other hand, is designed for people who need a passport quickly. Maybe you’ve received an unexpected job opportunity abroad, a last-minute business trip, or an emergency family situation. In those cases, the Tatkaal option can be a lifesaver.
But here’s something many websites don’t explain clearly. Faster processing doesn’t mean fewer checks.
In fact, Tatkaal applications often face extra document scrutiny because authorities want to make sure everything is correct before issuing a passport quickly. If your documents have errors, address mismatches, spelling mistakes, or missing information, the process can still get delayed.
Another thing to think about is the cost. Tatkaal fees are significantly higher than normal passport fees. So if your travel plans are months away, paying the extra amount may not make much sense.
Quick Comparison
| Feature | Normal Passport | Tatkaal Passport |
|---|---|---|
| Processing Speed | Regular | Faster |
| Application Fee | Lower | Higher |
| Best For | Routine applications | Urgent travel needs |
| Document Verification | Standard | More careful scrutiny |
| Recommended For | Most applicants | Genuine emergencies |
My simple advice? If you need a passport for future travel, studies, or general identification purposes, go with the normal application. It’s cheaper and works well for most people.
Choose Tatkaal passport apply online only when time is genuinely against you. Paying extra for speed is worth it when there’s a real reason, but not just because “faster sounds better.”
13. Common Mistakes to Avoid While Applying for Passport Online
Applying for a passport online isn’t very difficult. The form itself is pretty straightforward. The problem is that small mistakes can create big delays. I’ve seen people wait weeks longer than expected just because of one tiny error they didn’t notice while filling out the application.
One of the most common passport application mistakes is a name mismatch. Your name in the passport application should match exactly with your supporting documents. Even a small difference can cause trouble. For example, if your Aadhaar card says “Ravi Kumar Sharma” but your application says “Ravi K. Sharma,” officials may ask for clarification or additional documents. It sounds minor, but these little details matter.
Another mistake people make is entering the wrong date of birth. Sometimes applicants accidentally type the wrong year or month without realizing it. Before submitting the form, take a minute and double-check every number. Fixing a DOB mistake later can be frustrating and time-consuming.
Address-related issues are also very common. Many applicants move to a new house but forget to update their documents. Then they enter an old address in the application. This often creates a passport address mismatch problem during verification. If the address on your proof documents doesn’t match the address you entered, expect delays.
Here’s another thing people often overlook. They reach the Passport Seva Kendra carrying only photocopies. The staff usually asks for original documents for verification. Forgetting them can mean booking another appointment and wasting an entire day. Nobody enjoys that.
Booking the wrong passport office is another avoidable mistake. Some applicants choose a Passport Seva Kendra far from their current location without checking the jurisdiction rules. Spend a few minutes confirming the correct office before selecting an appointment slot.
Then comes police verification. Many people think the process is finished after visiting the passport office. Not really. If you ignore calls from the police station or miss verification appointments, your passport process can get delayed. Keep your phone active and respond when contacted.
One mistake that worries me the most is using fake agent websites. These sites often look surprisingly genuine. They charge extra fees for services you can easily do yourself on the official Passport Seva website. Always check the website address carefully before entering personal details or making payments.
A few extra minutes spent reviewing your application can save weeks of stress later. Slow down, check everything twice, and don’t rush through the process. Your future self will thank you.
14. FAQs
Can I apply for a passport online without an agent?
Yes, absolutely.
A lot of people still think they need a passport agent because the process looks complicated at first. I used to think the same thing years ago. But honestly, the official Passport Seva website has made things much easier than before.
You can create an account, fill out the application form, upload details, pay the fee, and book an appointment yourself. The only time you need to visit a Passport Seva Kendra (PSK) is for document verification, photos, and fingerprints.
If you can book a train ticket online, you can probably apply for a passport online too.
Just make sure you’re using the official Passport Seva website and not some random website promising “guaranteed passport approval.”
How many days does it take to get a passport?
This is probably one of the most common questions people ask.
The answer depends on several things, including your location, police verification, and whether you’re applying under the Normal or Tatkaal scheme.
For many applicants, a normal passport arrives within a few weeks after successful verification. Tatkaal passports are usually processed much faster.
That said, don’t make travel plans based on guesses.
I’ve seen people book flight tickets first and then panic when their passport gets delayed because of a document issue or police verification. It’s always safer to wait until the passport is actually in your hands.
Is Aadhaar card enough for a passport?
Not always.
An Aadhaar card is one of the most commonly accepted documents, especially for identity and address proof. However, passport authorities may ask for additional documents depending on your situation.
For example, if your current address doesn’t match your Aadhaar address, you might need another valid address proof.
Think of Aadhaar as a very useful document, but not necessarily the only document you’ll ever need.
Before your appointment, keep all original documents ready. Carrying a few extra documents is much better than making another trip to the passport office.
Can I apply for a passport from another state?
Yes, in many cases you can.
People move all the time for jobs, studies, or business. Maybe you’re from Telangana but currently working in Bengaluru. Or perhaps you’re studying in Delhi while your family lives somewhere else.
You can usually apply from your current place of residence if you can provide valid address proof for that location.
The key thing is that the address details and supporting documents should match. If there are inconsistencies, the verification process may take longer.
Can I change my passport appointment date?
Yes, you can reschedule your appointment through your Passport Seva account.
Life happens. Maybe you have an exam, an office meeting, a family emergency, or simply can’t make it on the selected date.
Instead of skipping the appointment, log in to your account and check the available rescheduling options.
One small tip: appointment slots in some cities fill up surprisingly fast. If you’re planning international travel, don’t wait until the last minute.
What is ARN in a passport application?
ARN stands for Application Reference Number.
Once you successfully submit your passport application, the system generates this number automatically.
Think of it like a tracking number for your application.
You’ll use the ARN to:
- Check application status
- Track progress
- View appointment details
- Refer to your application in future communications
A simple mistake many people make is not saving the ARN after submission. Take a screenshot, save the PDF, or write it down somewhere safe.
Trust me, you’ll thank yourself later.
Is police verification compulsory for a passport?
In most cases, yes.
Police verification is a normal part of the passport process and helps confirm your identity and address details.
A police officer may visit your address or contact you for verification, depending on the type of application and current procedures.
Many first-time applicants get nervous when they hear the words “police verification.” There’s usually no reason to worry if your documents and address details are accurate.
Just keep your documents ready and cooperate during the verification process.
Most people complete this stage without any major issues.
Can students apply for a passport online?
Of course.
Students apply for passports every year for higher education, internships, exchange programs, vacations, and future career opportunities.
In fact, even if you don’t have immediate travel plans, having a passport can be useful. It’s one of the strongest identity documents you can own.
Students may need additional supporting documents depending on their situation, especially if they’re staying in hostels, rented accommodation, or studying outside their hometown.
I often tell college students one simple thing: don’t wait until you receive an overseas admission letter to start the passport process. Getting your passport early can save a lot of stress later.
A passport might sit quietly in your drawer for months, but when an opportunity suddenly shows up, you’ll be glad it’s already there.
15. Conclusion
Getting a passport used to feel confusing. I still remember hearing people talk about long queues, piles of paperwork, and multiple office visits. Thankfully, things are much simpler now. Once you understand how to apply for passport online, the whole process becomes much less stressful.
The biggest thing I can suggest is this: don’t rush. Take a few extra minutes to keep your documents ready before you start. Check that your name, date of birth, address, and other details match across all documents. A small mistake can lead to delays that nobody wants to deal with.
Also, make sure you’re using only the official Passport Seva website. There are plenty of third-party sites online, and many people end up paying extra fees for things they can easily do themselves.
If you’ve reached this point, you’re already prepared. Gather your documents, fill out the application carefully, double-check everything before submission, and book your appointment with confidence. Before you know it, your passport will be on its way to your doorstep. Safe travels and good luck with your application!
Disclaimer: The Information and infographics(Images) used in this blog post are just for educate the people only.


Leave a Reply