Learning how to connect projector to laptop is easy: you only need the right cable and display setting. First, plug in an HDMI or USB-C cable; then turn on both devices.
Next, press Windows + K on a Windows laptop, or open System Settings > Displays on a Mac. Choose duplicate, extend, or projector-only mode.
Quick Key Points
- Use HDMI for most laptops.
- Use USB-C when your laptop supports video.
- Turn on the projector first.
- Pick the right display mode.
This helps in office meetings, classrooms, and home movie nights. That is the fastest way for how to connect projector to laptop.
Also, learn how to descale kettle at your home.
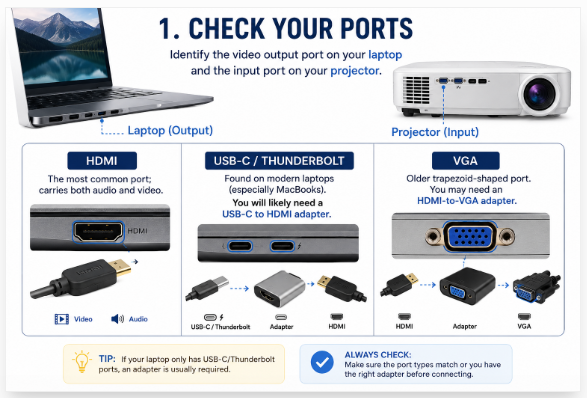
1. Check Your Ports First
Before you connect laptop to projector, check both ports first. This saves time and stops wrong cable trouble.
Look at your laptop side and projector back. You need one matching video port: HDMI, USB-C, Thunderbolt, or VGA.
- HDMI: best choice; it sends video and sound.
- USB-C / Thunderbolt: common on new laptops; use a USB-C to HDMI adapter.
- VGA: old port; use HDMI to VGA adapter if needed.
My simple rule: carry one HDMI cable and one small adapter. Then you can connect laptop to projector almost anywhere.
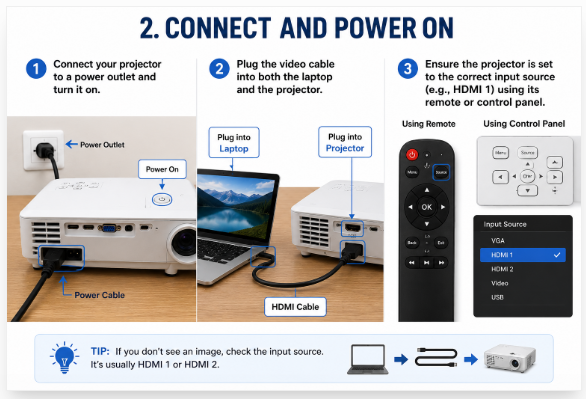
2. Connect and Power On
To connect laptop to projector, first plug the projector into a safe power outlet. Then press the power button: wait 30 to 60 seconds.
Next, plug one end of the video cable into your laptop. After that, plug the other end into the projector.
Use the Right Cable
Most new laptops use HDMI. So, use an HDMI cable when you can.
If your laptop has no HDMI port, use a USB-C to HDMI adapter. Also, keep the cable firm; loose cables cause a black screen.
Read More: How to delete old backups on iCloud?
Pick the Correct Input Source
Now take the projector remote. Press “Source” or “Input”: choose HDMI 1, HDMI 2, or VGA.
Use the same port name you used on the projector. For example, choose HDMI 1 if the cable is in HDMI 1.
Key Points
- Power on the projector first.
- Connect both cable ends well.
- Select the right input source.
- Recheck the port name.
This small check helps you connect laptop to projector fast, without panic.
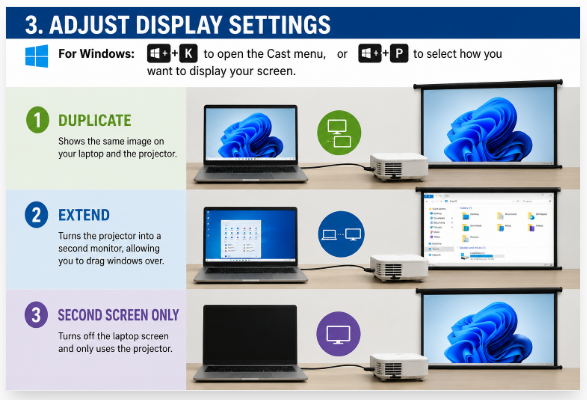
Adjust Display Settings
To connect laptop to projector, first fix the display mode. This helps you show the right screen fast.
For Windows, press Windows Key + K to open Cast. Or press Windows Key + P to pick a screen mode.
Choose the mode that fits your need:
- Duplicate: Your laptop and projector show the same screen.
- Extend: The projector works like a second screen.
- Second screen only: Your laptop screen turns off.
Use Duplicate for class, office, or home use. It is best when all people must see the same slide.
Use Extend when you want notes on your laptop. You can drag PPT, browser, or video to the projector.
Use Second screen only when the projector image looks better. This also saves your laptop screen space.
So, after you connect laptop to projector, always check display settings first.
For Mac: Connect Mac to Projector
To connect Mac to projector, click the Apple menu first. Then open System Settings, or System Preferences on older macOS.
Next, click Displays. Your Mac should show the projector name there.
Select the projector from the list. If it does not show, check the HDMI, USB-C, or adapter cable.
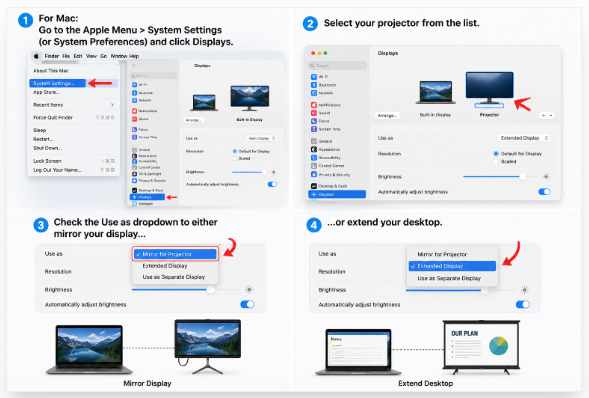
Choose Mirror or Extend
Now check the Use as menu. Choose Mirror Display when you want both screens to show the same thing.
Choose Extend Display when you want more screen space. This helps when you keep notes on Mac and slides on the projector.
- Mirror: Best for class, meetings, and quick demos.
- Extend: Best for slides, video, and multitasking.
I prefer Mirror for fast setup; it saves time. But Extend feels better when you present like a pro.
So, connect Mac to projector, pick the right display mode, and test it once before you start.