If you’ve recently switched from a Windows laptop to a Chromebook, one thing probably caught your attention pretty quickly: there’s no Windows key on the keyboard.
That tiny difference confuses a lot of people, especially when they’re trying to take a screenshot for the first time. You search for a shortcut, see instructions mentioning keys that don’t seem to exist on your Chromebook, and suddenly a simple task feels way more complicated than it should.
The good news? Taking a screenshot on a Chromebook is actually very easy once you know which key replaces the Windows key. In fact, ChromeOS includes several built-in screenshot options for capturing the entire screen, a specific window, or just part of the display.
Quick Answer
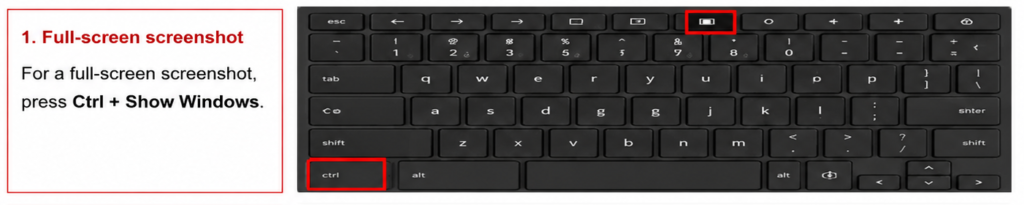
- Full-screen screenshot: Press Ctrl + Show Windows
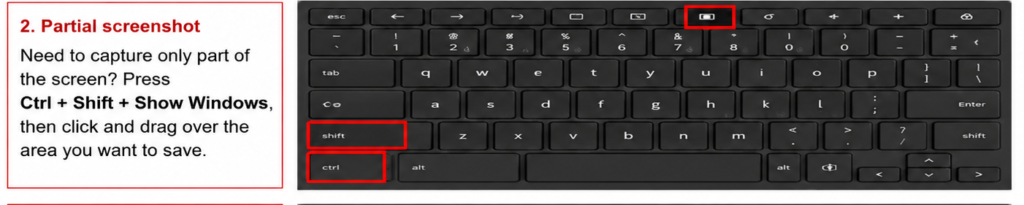
- Partial screenshot: Press Ctrl + Shift + Show Windows
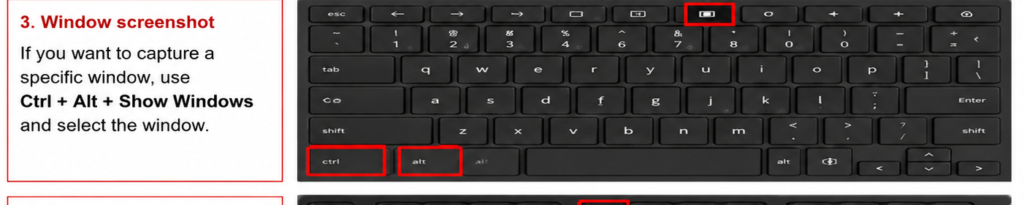
- Window screenshot: Press Ctrl + Alt + Show Windows
- Tablet mode screenshot: Press Power + Volume Down
If you’re wondering how to take a screenshot on Chromebook without a Windows key, don’t worry. I’ll walk you through every method step by step, including shortcuts for HP, Lenovo, Dell, and Asus Chromebooks, where screenshots are saved, and what to do if the screenshot keys aren’t working.
How Do You Screenshot on a Chromebook Without a Windows Key?
If you’re wondering how to screenshot on a Chromebook without a Windows key, the good news is that you don’t actually need a Windows key at all. Chromebooks use a different keyboard layout, so the screenshot shortcuts are built around the Show Windows key (sometimes called the Overview key).
For a full-screen screenshot, press Ctrl + Show Windows.
Need to capture only part of the screen? Press Ctrl + Shift + Show Windows, then click and drag over the area you want to save.
If you want to capture a specific window, use Ctrl + Alt + Show Windows and select the window.
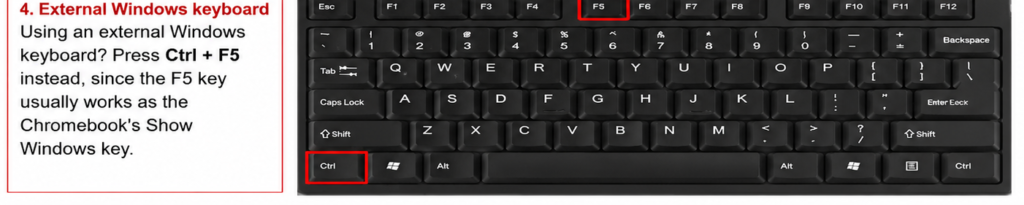
Using an external Windows keyboard? Press Ctrl + F5 instead, since the F5 key usually works as the Chromebook’s Show Windows key.
The screenshot will be saved automatically, so you don’t have to paste it anywhere. That’s one thing I really like about Chromebooks—it feels quick and hassle-free once you know the shortcut. According to Google’s Chromebook documentation, these are the official screenshot shortcuts used across ChromeOS devices.
Understanding the Chromebook Screenshot Key
If you’ve recently switched from a Windows laptop to a Chromebook, the keyboard can feel a little strange at first. I remember looking for the familiar Windows key and wondering why it wasn’t there. Then I tried taking a screenshot and got even more confused.
The good news is that Chromebook screenshots are actually very easy once you know which key Google replaced the Windows key with.
What Is the Key to Take a Screenshot on a Chromebook?
The key most people use to take a screenshot on a Chromebook is called the Show Windows key. Google also refers to it as the Overview key because it shows all your open windows at once.
You’ll usually find this key in the top row of the keyboard. Instead of a Windows logo, it has a small rectangle with two vertical lines next to it.
For a full-screen screenshot, press Ctrl + Show Windows.
Want to capture only part of your screen? Press Ctrl + Shift + Show Windows and then drag your cursor over the area you want to save.
On some newer Chromebooks, things are even simpler. Google has started adding a dedicated Screenshot key to the keyboard. If your device has one, you can open the Screen Capture tool with a single press instead of remembering keyboard shortcuts.
Read More: Best 5G Network in Hyderabad.
Show Windows Key on Chromebook
A lot of people search for “Show Windows key on Chromebook” because they’re expecting to see a Windows logo somewhere on the keyboard. That’s completely normal.
The Show Windows key is usually located where the F5 key would be on many Windows laptops. Look across the top row and find the key with a rectangle and two lines beside it. That’s the one.
If you’re using an external Windows keyboard with your Chromebook, the shortcut can work a little differently. In many cases, the F5 key acts as the Show Windows key, which makes taking screenshots much easier.
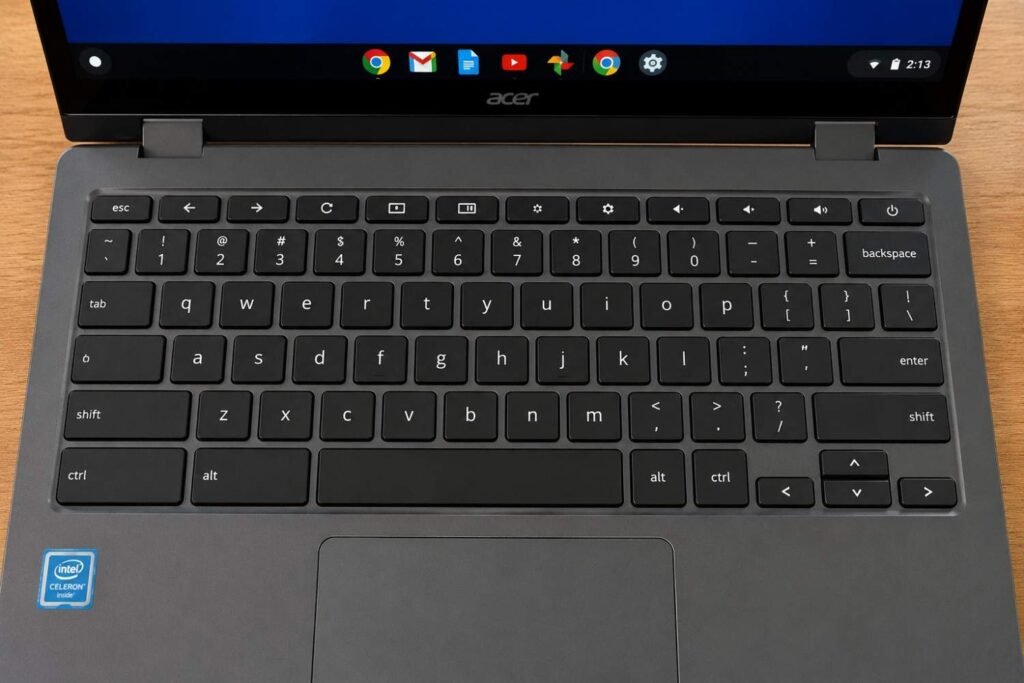
Image Recommendation: Include a Chromebook keyboard diagram that highlights the Show Windows (Overview) key and the Screenshot key found on newer Chromebook models. A simple labeled image helps readers identify the correct key in seconds.
How to Take a Full Screen Screenshot on Chromebook
If you’re wondering how do I take a full screen screenshot on a Chromebook, the good news is that it’s really simple once you know the shortcut.
Press Ctrl + Show Windows at the same time. The Show Windows key is usually located on the top row of your Chromebook keyboard and looks like a rectangle with two lines beside it. Some people also call it the Overview key.
As soon as you press the keys, your Chromebook captures everything that’s currently visible on the screen. You don’t need to open any extra app or tool. You’ll see a small notification in the corner letting you know the screenshot was saved.
I remember helping a friend who had just switched from a Windows laptop to a Chromebook. They kept looking for the Print Screen button and couldn’t find it anywhere. That’s pretty common because Chromebooks use a different keyboard layout. Once they learned this shortcut, taking screenshots became second nature.
If you need a quick screenshot Chromebook keyboard shortcut, this is the one most people use every day. It’s perfect for saving online receipts, capturing study notes, reporting an error message, or sharing something interesting you found online.
So, if you’re asking how do I take a screenshot in Chromebook, simply press Ctrl + Show Windows and your full-screen screenshot is done in seconds.
How to Take a Partial Screenshot on Chromebook
If you don’t need to capture the entire screen, a partial screenshot is usually the better option. I use it all the time when I only want to save a small part of a webpage, an error message, or a section of a document. It keeps things cleaner and saves you from cropping the image later.
To take a partial screenshot on Chromebook with a keyboard, press Ctrl + Shift + Show Windows. The screen will dim slightly, and your cursor will change into a crosshair.
Now, click and drag over the area you want to capture. Once you release the mouse or trackpad, the screenshot is taken automatically. That’s it. No extra steps, no need to open another app.
If you’re wondering how to take a screenshot on Chromebook with keyboard shortcuts, this is one of the quickest methods available. It only takes a few seconds after you’ve done it once or twice.
Your Chromebook will save the screenshot automatically, and you’ll usually see a small notification in the corner of the screen. You can click it right away to view, edit, or share the image.
For most people, a Chromebook partial screenshot is the easiest way to grab exactly what they need without capturing unnecessary parts of the screen.
Also, Find the interesting topic about iPhone 18 2026 assumptions.
How to Screenshot on Chromebook Without Windows Key or F5
If you’re trying to figure out how to screenshot on Chromebook without Windows key or F5, don’t worry. You’re not stuck. A lot of Chromebook users run into this issue, especially when they’re using an external keyboard or a Chromebook model that looks a little different from the guides they find online.
The good news is that ChromeOS gives you a few other ways to capture your screen.
Method 1: Use the Screen Capture Tool
This is probably the easiest option because you don’t need to remember any keyboard shortcuts.
- Click the clock in the bottom-right corner of your screen.
- Open Quick Settings.
- Click Screen Capture.
- Choose whether you want a full-screen shot, a partial screenshot, or a specific window.
- Click to capture it.
Honestly, this is the method I recommend to most people. It’s simple, works on almost every Chromebook, and gives you more control than keyboard shortcuts.
Method 2: Use the Touchscreen
If your Chromebook has a touchscreen, taking screenshots can feel a lot easier.
Open the Screen Capture tool from Quick Settings and use your finger to select the area you want to capture. This works especially well when you’re reading a webpage, viewing notes, or marking up school assignments. You don’t have to reach for extra keys or figure out keyboard combinations.
Method 3: Use Tablet Mode
Many people don’t realize this option exists.
When your Chromebook is folded into tablet mode, you can take a screenshot by pressing the Power button and the Volume Down button at the same time. It’s very similar to taking a screenshot on an Android phone.
This method is useful when the keyboard isn’t accessible or when you’re holding the device like a tablet. For example, if you’re showing a presentation, reading an ebook, or watching a video in tablet mode, reaching keyboard shortcuts can be awkward. The Power + Volume Down shortcut is much quicker.
So if you’re looking for a Chromebook screenshot without keyboard shortcuts, tablet mode is often the fastest solution.
After taking the screenshot, ChromeOS automatically saves it, and you’ll usually find it in your Downloads folder unless you’ve changed the default save location.
How to Take a Screenshot on Chrome with Keyboard
If you’re trying to figure out how to take a screenshot on Chrome with keyboard, the process is actually pretty simple once you know which keys to use. The only thing that confuses many people is that Chromebook keyboards don’t have the same layout as Windows laptops.
Chromebook Keyboard
On a Chromebook, press Ctrl + Show Windows to capture the entire screen. The Show Windows key sits on the top row and looks like a rectangle with two vertical lines next to it. If you’ve recently switched from a Windows laptop, you might spend a few minutes searching for the Print Screen key before realizing it isn’t there. I know I did.
Need to capture only part of the screen? Press Ctrl + Shift + Show Windows, then drag your cursor over the area you want to save. It’s quick and works really well for grabbing small sections of a webpage, an image, or a chat conversation.
External Windows Keyboard
A lot of Chromebook users connect external keyboards, especially Logitech and standard Windows keyboards. In that case, the shortcut changes slightly because there isn’t a dedicated Show Windows key.
Simply press Ctrl + F5 to take a screenshot. This acts as the Chromebook equivalent of Ctrl + Show Windows. If the shortcut doesn’t work right away, check your keyboard settings and make sure the function keys are enabled correctly.
Many Chromebook users in online communities recommend this method because it’s the fastest solution when you’re working with an external keyboard. Once you try it a couple of times, it becomes second nature.
Chromebook Brand-Specific Screenshot Methods
One thing that confuses a lot of Chromebook users is whether screenshot shortcuts change from one brand to another. That’s a fair question, especially if you’ve just switched from a Windows laptop.
The good news? Whether you’re using an HP, Lenovo, Dell, or Asus Chromebook, ChromeOS handles screenshots the same way. The logo on the lid may be different, but the screenshot shortcuts stay exactly the same.
How to Screenshot on HP Chromebook With Keyboard
If you’re trying to take an HP Chromebook screenshot, press Ctrl + Show Windows to capture the entire screen.
The Show Windows key sits on the top row of the keyboard. It looks like a rectangle with two vertical lines beside it. If you’ve never noticed it before, you’re not alone. A lot of people spend months using a Chromebook before realizing that’s the key used for screenshots.
Need to capture only part of the screen? Press Ctrl + Shift + Show Windows, then drag over the area you want to save.
How to Take a Screenshot on a Lenovo Chromebook Without Windows Key
Many people search for ways to take a screenshot on a Lenovo Chromebook without a Windows key because Chromebook keyboards don’t actually have a traditional Windows key.
Instead, use the Show Windows key. The shortcut is still:
Ctrl + Show Windows for a full screenshot.
If you’re using an external Windows keyboard with your Lenovo Chromebook, press Ctrl + F5. ChromeOS treats the F5 key as the Show Windows key on most external keyboards.
That little detail saves a lot of frustration.
How to Screenshot on Dell Chromebook
Taking a Dell Chromebook screenshot works exactly the same way.
For a full-screen capture:
Ctrl + Show Windows
For a selected area:
Ctrl + Shift + Show Windows
If the shortcut doesn’t seem to work, check whether you’re connected to an external keyboard. In many cases, users accidentally press the wrong function key because the Chromebook keyboard layout is slightly different from a standard Windows laptop.
How to Screenshot on Asus Chromebook
If you own an Asus Chromebook, you don’t need any special software or brand-specific shortcut.
Press Ctrl + Show Windows to capture the entire screen.
For partial screenshots, use Ctrl + Shift + Show Windows and select the area you want.
Personally, I find partial screenshots much more useful. Most of the time, I only need a small section of a webpage, an error message, or a receipt confirmation. Cropping later takes extra time, so grabbing only what you need from the start makes life easier.
No matter which Chromebook brand you use—HP, Lenovo, Dell, Asus, Acer, Samsung, or another model—the screenshot tools built into ChromeOS work the same way. Once you learn the shortcuts once, you’re set across every Chromebook you use.
Where Do Screenshots Go on a Chromebook?
One of the most common questions people ask after taking a screenshot is, “Where do screenshots go on a Chromebook?” I’ve seen this happen a lot, especially with new Chromebook users. You take the screenshot, hear the capture sound, and then spend the next few minutes trying to figure out where the file disappeared.
By default, Chromebook saves screenshots in the Downloads folder. This is usually the first place to check. Open the Files app and click Downloads in the left sidebar. Most of the time, you’ll find your screenshot there with a name that includes the date and time it was taken.
On some newer ChromeOS versions, screenshots may also appear in the Images folder inside the Files app. This makes it a little easier to keep screenshots separate from downloaded documents, PDFs, and other files.
If you’ve turned on Google Drive integration, your Chromebook can save screenshots directly to Google Drive instead of storing them only on the device. That’s handy if you switch between multiple devices and want your screenshots available everywhere without manually uploading them.
A quick tip from experience: if you take screenshots often for school, work, or tutorials, it’s worth creating a dedicated folder. It saves a surprising amount of time later when you’re trying to find that one screenshot you captured weeks ago.
How to Crop a Screenshot on Chromebook
If you’ve already taken a screenshot and only want to keep part of it, cropping is quick on a Chromebook. I end up doing this all the time when a screenshot captures extra tabs, notifications, or random clutter around the edges.
Method 1: Crop a Screenshot Using the Gallery App
Open the screenshot from your Downloads folder and launch it in the Gallery app. Click the crop icon, drag the edges until only the area you want remains, and save the changes. It’s probably the fastest option if you just need a simple crop.
Method 2: Use the Built-In Screenshot Editor
Some newer Chromebooks let you edit screenshots right after you capture them. When the preview appears, open the editing tools and trim away anything you don’t need before saving. It saves a few extra clicks.
Method 3: Crop a Screenshot in Google Photos
If your screenshots sync to Google Photos, open the image, select Edit, then choose Crop. This works well when you’re already organizing photos in your Google account.
That’s really all there is to how to crop a screenshot on Chromebook. Once you’ve done it once or twice, it becomes second nature.
Chromebook Screenshot Shortcuts Explained
If you’re new to ChromeOS, it’s easy to get confused by keyboard shortcuts. A lot of people switch from Windows to a Chromebook and assume the same key combinations will work. I made that mistake too the first time I used one.
Is Ctrl + Shift + S to Screenshot?
No, Ctrl + Shift + S is not the screenshot shortcut on a Chromebook.
This is one of the most searched Chromebook questions because many Windows users are used to different screenshot tools and shortcuts. On ChromeOS, the shortcut is a little different.
To take a selected-area screenshot, press:
Ctrl + Shift + Show Windows
The Show Windows key looks like a rectangle with two vertical lines beside it. You’ll usually find it on the top row of your Chromebook keyboard where the F5 key would normally be on a Windows laptop.
Once you press the shortcut, your cursor changes so you can drag and select the exact area you want to capture. It’s quick, and honestly, after using it a few times, it becomes second nature.
What Does Ctrl + Shift + T Do on Chromebook?
This shortcut has nothing to do with screenshots, but it’s one of those keyboard shortcuts you’ll probably end up using all the time.
Pressing Ctrl + Shift + T reopens the last browser tab you accidentally closed.
We’ve all done it. You close a tab, realize two seconds later that you still needed it, and immediately regret it. Instead of searching through your history, just press Ctrl + Shift + T and the tab comes right back.
A small shortcut, but a real time-saver.
What Does Ctrl + Alt + Z Do on a Chromebook?
Ctrl + Alt + Z turns ChromeVox on or off.
ChromeVox is Google’s built-in screen reader designed to help people with visual impairments navigate a Chromebook using spoken feedback.
Sometimes people accidentally enable it and suddenly their Chromebook starts reading everything aloud. If that happens, don’t panic. Press Ctrl + Alt + Z again and ChromeVox will turn off.
It’s one of those shortcuts most people never think about until they trigger it by mistake.
Troubleshooting Chromebook Screenshot Problems
Screenshot Shortcut Not Working?
If your screenshot shortcut suddenly stops working, don’t panic. It happens more often than you’d think. I’ve seen it happen after a ChromeOS update, and sometimes it was something as simple as pressing the wrong key without realizing it.
One common reason is a keyboard mapping issue. Chromebook keyboards don’t look exactly like Windows keyboards, so if you’re using an external keyboard, some keys may not behave the way you expect. For example, the Show Windows key might be mapped differently or missing altogether.
Another thing worth checking is whether you’re using an external keyboard. Some third-party keyboards can create shortcut conflicts, especially if they were designed for Windows. In those cases, Chromebook screenshot shortcuts may stop responding even though the keyboard seems to work normally.
If the shortcut used to work and now it doesn’t, your Chromebook might just need a quick refresh. Start by restarting the device. It sounds basic, but I’ve fixed plenty of random Chromebook problems that way.
Still not working? Check for ChromeOS updates. Older software versions can sometimes cause strange shortcut issues. Open Settings > About ChromeOS and install any available updates.
You should also take a look at your keyboard settings. If you’ve changed key assignments in the past, one of those changes could be interfering with screenshot shortcuts.
And if you’re in a hurry and just need the screenshot right now, use the built-in Screen Capture tool. Open Quick Settings, click Screen Capture, and take your screenshot without using any keyboard shortcuts at all. It’s simple, reliable, and honestly the method many Chromebook users end up preferring anyway.
Chromebook Screenshot Tips from Real Users
One thing I’ve noticed while reading Chromebook forums, Reddit discussions, and YouTube comments is that real users often come up with practical solutions that don’t always make it into official guides.
For example, many people use an external Windows keyboard with their Chromebook. The first time they try to take a screenshot, they can’t find the Show Windows key because, well, it doesn’t exist on a standard Windows keyboard. A common workaround shared by Chromebook users is to use F5 as the replacement for the Show Windows key. Once you know that little trick, taking screenshots feels much easier.
Another thing that comes up again and again is the built-in Screen Capture toolbar. A lot of users actually prefer it over keyboard shortcuts. Instead of memorizing key combinations, they click the Screen Capture tool and choose whether they want a full-screen screenshot, a selected area, or even a screen recording. It’s simple, especially if you don’t take screenshots every day.
Can I Screenshot in Tablet Mode?
Yes, you can. If your Chromebook supports tablet mode, press the Power and Volume Down buttons at the same time. It works a lot like taking a screenshot on an Android phone.
Can I Capture a Single Window?
You can. Open the Screen Capture tool, choose the window capture option, and then click the window you want to save. This is really useful when you don’t want your entire desktop showing in the image.
Can I Take Scrolling Screenshots?
This is a question people ask a lot. Right now, ChromeOS doesn’t offer a built-in scrolling screenshot feature for most users. If you need to capture an entire webpage, browser extensions or third-party screenshot tools are usually the easiest option.
Honestly, these are the kinds of real-world questions people run into after the first screenshot. That’s why community discussions can be surprisingly helpful. They often cover the small everyday situations that many ranking articles completely overlook.
FAQ
How do you screenshot on a Chromebook without a Windows key?
A lot of people get confused by this because Chromebooks don’t have a Windows key like regular Windows laptops. Instead, they use the Show Windows key, which looks like a rectangle with two vertical lines beside it.
To take a screenshot, press Ctrl + Show Windows. If your Chromebook doesn’t have that key or you’re using an external keyboard, you can open the Screen Capture tool from Quick Settings and take a screenshot that way. Honestly, that’s often the easiest option for beginners because you don’t have to remember any shortcuts.
How do I take a screenshot in Chromebook?
The quickest way is to press Ctrl + Show Windows for a full-screen screenshot.
If you only want part of the screen, press Ctrl + Shift + Show Windows and drag your cursor over the area you want to capture. ChromeOS will save the image automatically, so there’s no extra step afterward.
What is the key to take a screenshot on a Chromebook?
The main screenshot key is the Show Windows key, sometimes called the Overview key. You’ll usually find it on the top row of the keyboard.
Newer Chromebook models may also include a dedicated Screenshot key, which opens the Screen Capture menu directly.
How do I take a full screen screenshot?
For a full-screen screenshot, press:
Ctrl + Show Windows
The screen will briefly flash, and your screenshot will be saved automatically. If you’ve ever used the Print Screen key on a Windows laptop, this is basically the Chromebook version of that shortcut.
Where do screenshots go on a Chromebook?
By default, screenshots are saved in the Downloads folder.
You can find them by opening the Files app. If you have Google Drive syncing enabled, your screenshots may also appear in a Drive folder, depending on your settings.
If you’ve just taken a screenshot and can’t find it, checking the Downloads folder first usually solves the mystery.
Is Ctrl+Shift+S to screenshot?
No, Ctrl + Shift + S is not the standard screenshot shortcut on a Chromebook.
For screenshots, you’ll normally use:
- Ctrl + Show Windows for a full screenshot
- Ctrl + Shift + Show Windows for a partial screenshot
This is one of those shortcuts that people often mix up because different operating systems use different key combinations.
Can I take a screenshot using an external keyboard?
Yes, absolutely.
If you’re using a Windows keyboard connected to your Chromebook, you can usually press Ctrl + F5 to take a screenshot. The F5 key works as a replacement for the Chromebook’s Show Windows key on many external keyboards.
This is especially useful if you’re using a docking station, monitor setup, or a wireless keyboard at your desk.
Why is my Chromebook screenshot shortcut not working?
If the screenshot shortcut suddenly stops working, don’t panic. It’s usually something simple.
Try these steps:
- Restart your Chromebook.
- Check for a ChromeOS update.
- Test the Screen Capture tool from Quick Settings.
- Disconnect and reconnect any external keyboard.
- Make sure the keys aren’t physically stuck or damaged.
I’ve seen cases where a quick restart fixed the issue in less than a minute. If the shortcut still doesn’t work, using the built-in Screen Capture tool is a good temporary workaround while you troubleshoot the keyboard.


Leave a Reply